
Learn to leverage Spring Boot’s simplicity to create SOAP webservice. In this Spring Boot SOAP WS tutorial, we will focus only on the Spring boot-related configurations to see how easily we can create our ‘contract-first SOAP webservice‘.
We will build a simple contract-first SOAP web service where we will implement Student search functionality with a hard-coded backend for demo purposes.
1. Technology Stack
- JDK 21, IntelliJ IDE
- Spring Boot 3.2.4
- wsdl4j – for publishing WSDL for our Service
- SOAP-UI – for testing our service
- JAXB Maven plugin – for WS code generation
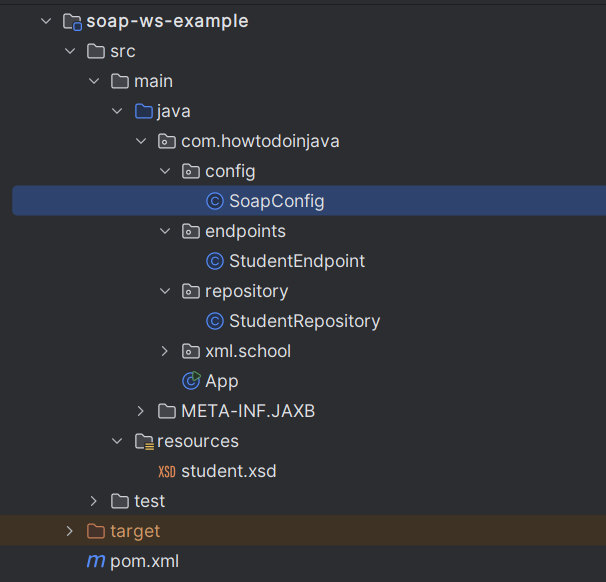
2. Project Structure
The classes and files created for this demo are shown below.
3. Create a Spring Boot Project
Create one spring boot project from Spring Initializr site with Web Services dependency only. After selecting the dependency and giving the proper maven GAV coordinates, download the project in zipped format. Unzip and then import the project in Eclipse as a maven project./co
<dependency>
  <groupId>org.springframework.boot</groupId>
  <artifactId>spring-boot-starter-web-services</artifactId>
</dependency>

<dependency>
  <groupId>wsdl4j</groupId>
  <artifactId>wsdl4j</artifactId>
</dependency>
4. Create SOAP Domain Model from Xsd File
As we are following the contract-first approach for developing the service, we need to first create the domain (methods and parameters) for our service. For simplicity, we have kept both request and response in the same XSD, but in an actual enterprise use case, we will have multiple XSDs importing each other to form the final definition.
4.1. XSD File
Place the following file in ‘/src/main/resources‘ folder of the project.
<xs:schema xmlns:xs="http://www.w3.org/2001/XMLSchema" xmlns:tns="http://www.howtodoinjava.com/xml/school"
           targetNamespace="http://www.howtodoinjava.com/xml/school" elementFormDefault="qualified">

  <xs:element name="StudentDetailsRequest">
    <xs:complexType>
      <xs:sequence>
        <xs:element name="name" type="xs:string"/>
      </xs:sequence>
    </xs:complexType>
  </xs:element>

  <xs:element name="StudentDetailsResponse">
    <xs:complexType>
      <xs:sequence>
        <xs:element name="Student" type="tns:Student"/>
      </xs:sequence>
    </xs:complexType>
  </xs:element>

  <xs:complexType name="Student">
    <xs:sequence>
      <xs:element name="name" type="xs:string"/>
      <xs:element name="standard" type="xs:int"/>
      <xs:element name="address" type="xs:string"/>
    </xs:sequence>
  </xs:complexType>

</xs:schema>
4.2. Jaxb Maven Plugin
We will use jaxb2-maven-plugin to generate the domain classes efficiently from XML schemas (XSD files) using JAXB API. We need to now add the below maven plugin to the build section of the project’s pom.xml file.
<build>
  <plugins>

    <plugin>
      <groupId>org.codehaus.mojo</groupId>
      <artifactId>jaxb2-maven-plugin</artifactId>
      <version>3.1.0</version>
      <executions>
        <execution>
          <id>xjc</id>
          <goals>
            <goal>xjc</goal>
          </goals>
        </execution>
      </executions>
      <configuration>
        <sources>
          <source>src/main/resources/student.xsd</source>
        </sources>
        <outputDirectory>src/main/java</outputDirectory>
        <clearOutputDir>false</clearOutputDir>
      </configuration>
    </plugin>

  </plugins>
</build>
The plugin uses the XJC tool as a code-generation engine. XJC compiles an XML schema file into fully annotated Java classes.
Now execute the maven compile command to generate Java code from XSD.
mvn compile5. SOAP Webservice Endpoint
The StudentEndpoint class will handle all the incoming requests for the service and will delegate the call to the finder method of the data repository.
Here few details about the annotations –
@Endpointregisters the class with Spring WS as a potential candidate for processing incoming SOAP messages.@PayloadRootis then used by Spring WS to pick the handler method based on the message’s namespace and localPart. Please note the Namespace URL and Request Payload root request mentioned in this annotation.@RequestPayloadindicates that the incoming message will be mapped to the method’s request parameter.- The
@ResponsePayloadannotation makes Spring WS map the returned value to the response payload.
import com.howtodoinjava.repository.StudentRepository;
import org.springframework.beans.factory.annotation.Autowired;
import org.springframework.ws.server.endpoint.annotation.Endpoint;
import org.springframework.ws.server.endpoint.annotation.PayloadRoot;
import org.springframework.ws.server.endpoint.annotation.RequestPayload;
import org.springframework.ws.server.endpoint.annotation.ResponsePayload;
import com.howtodoinjava.xml.school.StudentDetailsRequest;
import com.howtodoinjava.xml.school.StudentDetailsResponse;

@Endpoint
public class StudentEndpoint
{
  private static final String NAMESPACE_URI = "http://www.howtodoinjava.com/xml/school";

  private StudentRepository StudentRepository;

  @Autowired
  public StudentEndpoint(StudentRepository StudentRepository) {

    this.StudentRepository = StudentRepository;
  }

  @PayloadRoot(namespace = NAMESPACE_URI, localPart = "StudentDetailsRequest")
  @ResponsePayload
  public StudentDetailsResponse getStudent(@RequestPayload StudentDetailsRequest request) {

    StudentDetailsResponse response = new StudentDetailsResponse();
    response.setStudent(StudentRepository.findStudent(request.getName()));
    return response;
  }
}
6. Add SOAP Webservice Configuration Beans
Create a class with @Configuration annotation to hold bean definitions.
Here few details about the annotations –
- The SoapConfig class extends WsConfigurerAdapter which configures an annotation-driven Spring-WS programming model.
- MessageDispatcherServlet is used by Spring-WS for handling SOAP requests. We need to inject ApplicationContext to this servlet so that Spring-WS finds other beans. It also declares the URL mapping for the requests.
- DefaultWsdl11Definition exposes a standard WSDL 1.1 using
XsdSchema. The bean namestudentDetailsWsdlwill be the WSDL name that will be exposed. It will be available under ‘http://localhost:8080/service/studentDetailsWsdl.wsdl‘. This is the simplest approach to expose the contract first to WSDL in spring. - This configuration also uses the WSDL location servlet transformation ‘servlet.setTransformWsdlLocations( true )‘ internally. If we see the exported WSDL, the ‘soap:address‘ will have the ‘localhost‘ address. Similarly, if we instead visit the WSDL from the public-facing IP address assigned to the deployed machine, we will see that address instead of ‘localhost‘. So the endpoint URL is dynamic based on the deployment environment.
import org.springframework.boot.web.servlet.ServletRegistrationBean;
import org.springframework.context.ApplicationContext;
import org.springframework.context.annotation.Bean;
import org.springframework.context.annotation.Configuration;
import org.springframework.core.io.ClassPathResource;
import org.springframework.ws.config.annotation.EnableWs;
import org.springframework.ws.config.annotation.WsConfigurerAdapter;
import org.springframework.ws.transport.http.MessageDispatcherServlet;
import org.springframework.ws.wsdl.wsdl11.DefaultWsdl11Definition;
import org.springframework.xml.xsd.SimpleXsdSchema;
import org.springframework.xml.xsd.XsdSchema;

@EnableWs
@Configuration
public class SoapConfig extends WsConfigurerAdapter {

  @Bean
  public ServletRegistrationBean messageDispatcherServlet(ApplicationContext applicationContext) {
    MessageDispatcherServlet servlet = new MessageDispatcherServlet();
    servlet.setApplicationContext(applicationContext);
    servlet.setTransformWsdlLocations(true);
    return new ServletRegistrationBean(servlet, "/service/*");
  }

  @Bean(name = "studentDetailsWsdl")
  public DefaultWsdl11Definition defaultWsdl11Definition(XsdSchema studentSchema) {
    DefaultWsdl11Definition wsdl11Definition = new DefaultWsdl11Definition();
    wsdl11Definition.setPortTypeName("StudentDetailsPort");
    wsdl11Definition.setLocationUri("/service/student-details");
    wsdl11Definition.setTargetNamespace("http://www.howtodoinjava.com/xml/school");
    wsdl11Definition.setSchema(studentSchema);
    return wsdl11Definition;
  }

  @Bean
  public XsdSchema studentSchema() {
    return new SimpleXsdSchema(new ClassPathResource("student.xsd"));
  }
}
7. Demo
Do maven build using ‘mvn clean install‘ and start the application using ‘java -jar target\spring-boot-soap-service-0.0.1-SNAPSHOT.jar‘ command. This will bring up one Tomcat server in default port 8080 and application will be deployed in it.
1. Now go to ‘http://localhost:8080/service/studentDetailsWsdl.wsdl‘ to see if the WSDL is coming properly.

2. Once we have the successful WSDL generated, we can use that WSDL to create a project in SOAP UI and test the application. Sample Request and response is given below.
Request:
<soapenv:Envelope xmlns:soapenv="http://schemas.xmlsoap.org/soap/envelope/" xmlns:sch="http://www.howtodoinjava.com/xml/school">
   <soapenv:Header/>
   <soapenv:Body>
      <sch:StudentDetailsRequest>
         <sch:name>Sajal</sch:name>
      </sch:StudentDetailsRequest>
   </soapenv:Body>
</soapenv:Envelope>
Response:
<SOAP-ENV:Envelope xmlns:SOAP-ENV="http://schemas.xmlsoap.org/soap/envelope/">
   <SOAP-ENV:Header/>
   <SOAP-ENV:Body>
      <ns2:StudentDetailsResponse xmlns:ns2="http://www.howtodoinjava.com/xml/school">
         <ns2:Student>
            <ns2:name>Sajal</ns2:name>
            <ns2:standard>5</ns2:standard>
            <ns2:address>Pune</ns2:address>
         </ns2:Student>
      </ns2:StudentDetailsResponse>
   </SOAP-ENV:Body>
</SOAP-ENV:Envelope>
8. Summary
In this Spring boot tutorial, we learned to create a SOAP webservice using Spring Boot 3. We also learned to generate Java code from WSDL. We learned about beans which are needed to process the SOAP requests.
Feel free to drop a comment if you face any difficulty in running the above project.
Happy Learning !!
Comments