I have been looking for a good and simple "Java library to extract links (URLs, email addresses) from plain text". I was searching on Github and found this little gem called autolink-java by Robin Stocker (robinst).
This library was used in a proof-of-concept (POC) I was working on at work. We needed to be able to extract all of the links from a page, and display them. This includes hyperlinks and email addresses. This little gem met the bill, and was quick to parse the text file I used.
The example requires the following maven dependencies:
This framework extracted a list of URLs from a file that looks like this:
As you can see, it generates a nice extraction of the URLs from the surrounding text. Give it a try and let me know what you think.
The project has been uploaded to Bitbucket and can be found here: autolink-java-extractor.
Showing posts with label Java. Show all posts
Showing posts with label Java. Show all posts
Friday, July 21, 2017
Thursday, August 04, 2016
How to Generate an SHA-2 (SHA-256) Self-Signed Certificate in Java
I was working on a couple of SSL based issues when I made a couple of observations. The default self-signed key generation in Java does not meet today's requirements for web development.
SHA-1 based certificates (default) are no longer going to be accepted by the majority of browsers. Microsoft has set a deadline of February 2014, Mozilla, and Chrome on 1 January 2017.
Additionally, a key size of less than 2048 is considered insecure as well, so we need to make sure the key size is at least 2048.
So how do you generate a SHA-2 (SHA-256) certificate in Java? Here is an example below.
keytool -genkey -alias example -keyalg RSA -sigalg SHA256withRSA -keysize 2048 -validity 3650 -keystore keystore.jks-sigalg SHA256withRSA is used to set it to SHA-256.
Tuesday, June 28, 2016
Abuse Report Format (ARF) Message Generator
.png) |
| Wikipedia |
I was surprised that I couldn't find any framework when I was searching to do it. As any good developer, I decided to write my own way of testing it.
The Abuse Report Format (ARF) Message Generator takes a raw email, and sends it back to the server that sent it as an abuse feedback report.
The code requires JavaMail API and Sun DSN API.
The project includes a custom mailcap file to handle the new ARF report format.
The code is located on Github including the sample usage here: arf-message-generator
Friday, June 24, 2016
Log4j2 java.util.logging (JUL) Adapter Example
Introduction
I was looking for an example of how to implement the java.util.logging (JUL) adapter in a project. This would almost seem to be a no brainer of an idea with lots of examples of how to do it. Alas, I didn't find much of anything. So I thought I would share some wisdom of how to implement the JUL Adapter.
Implementation
You need to tell the application to use the JUL adapter. There are two easy ways to accomplish this.
- The easiest is to pass a VM option to the application:
-Djava.util.logging.manager=org.apache.logging.log4j.jul.LogManager - Alternatively, you can use a static initializer in your class. This is important because the value needs to be set before the logger is called.
The code for the project can be found on GitHub here: log4j2-jul-example
Code
Sunday, March 20, 2016
Google Guava IP and Hostname Validation
I was trying to come up with a way to validate hostnames and IP addresses. I didn't want to spend time trying to do it myself. I figured that this should be a common situation, and likely someone had already written a tool to do just such a thing. I was right. Google Guava has a couple of interesting classes that do exactly what I was looking for.
For folks who may not be familiar with Guava, it is a framework of really helpful utilities that can be used for a variety of situations. Most folks who use Guava in my experience use the collections classes. However, there is a boon for anyone who digs a little deeper.
We will use two specific classes from the Guava framework to do our validations. The first is
There are some caveats to the
In the code below, we see that it is very easy to use and it works very well.
For folks who may not be familiar with Guava, it is a framework of really helpful utilities that can be used for a variety of situations. Most folks who use Guava in my experience use the collections classes. However, there is a boon for anyone who digs a little deeper.
We will use two specific classes from the Guava framework to do our validations. The first is
InternetDomainName which is used to validate the domain name. The other is InetAddresses to check our IP address for validity.There are some caveats to the
InternetDomainName class which are explained here: InternetDomainNameExplained.
In the code below, we see that it is very easy to use and it works very well.
Sunday, September 06, 2015
Book Review: Murach's Java Servlets and JSP
Cyndi Vasquez sent me this title a while back. I have been so bogged down that I finally got a chance to look at it. Thanks Murach... this is a good book.
The book is written in a style that many will either love, or hate. I personally am on the former. The pages on the left side are an explanation of the technical matter, and the right side are examples. The book is designed to guide you from front to back on an adventure into programming. Along the safari, I assure you will be pleased. The quarry is knowledge and this book is the tool to capture it.
The books is divided into five sections which will take you from absolute beginner to accomplished Servlet and JSP aficionado. It will even teach you a little about databases, and JSF along the way. There are two appendices that will show you how to set up your computer either Mac, or PC before you get started on your journey.
One of the thrills about this book is the use of NetBeans. I believe that NetBeans is the easiest tool for developing web based applications using Servlets and JSP. It also is my preferred tool for Java development in general. The book not only teaches you about the essentials of the title technologies, but helps you gain an in-depth knowledge of a valuable IDE that you can bank your career on.
Section one covers the basics of the technology and the MVC pattern. This is followed by a crash course on HTML, CSS, and web technologies based on Java. The 8th chapter on EL is a great reference for how to use this important technology in your web applications.
Section three covers essential database skills to get you started with web development. These skills are the bare minimum to get started, but are complete for the purpose of this book. Keep in mind, these are the basics.
Section four is the meat of the book. This covers the advanced Servlet and JSP skills. It also covers some additional technologies like JSF. My favorite parts of this section are chapters 18, 19, and 20. The HTTP Request and Response skills are something every developer should strive to make sure they understand. Chapter 19 covers listeners which are truly your friends. Chapter 20 covers another often misused, abused, and otherwise fantastic technology. The filter can make your life as a web developer a great pleasure, or a rabbit hole in which you feel like Alice in Wonderland.
The final concluding section five puts all of the pieces together in a Music Store website. The Music Store website uses most of the technologies covered, and takes the learner to the next level with clear and concise directions.
Overall this is a great book for anyone interested in learning about Servlet and JSP technology. Please keep in mind that all Java web technologies are based on the Servlet foundation. JSF is nothing more than a veneer on top of this technology as an example.
Friday, March 27, 2015
A Simple Method to invoke @PreDestroy on a Class

@PreDestroy annotated method in a class. This will approach will work with other annotations as well.Friday, December 26, 2014
ExecutorService Conundrum
I was asked by someone to solve a problem with threads that they were having. They wanted to cancel a
The code for this project can be downloaded here: runnable-example
As you can see from the results of the run, the future is canceled, but still keeps running. Then it gets interrupted, and breaks. So the question is why is it still running after being canceled.
Here is the
So the do you have an answer? The answer is at the bottom of the blog. Don't peek... think!
Future that was sent to an ExecutorService. I told them to look at a previous posts I had done on the subject. However, they insisted that this was different. So I took a look at the code. Alas, it was slightly different, but like most folks including me, they were too close to the problem to see the answer. I looked at it, and at first glance I thought something was askew, but it was not.
The code for this project can be downloaded here: runnable-example
As you can see from the results of the run, the future is canceled, but still keeps running. Then it gets interrupted, and breaks. So the question is why is it still running after being canceled.
Here is the
Runnable and the main class to execute it:
MyRunnable.java
Main.java
So the do you have an answer? The answer is at the bottom of the blog. Don't peek... think!
Reference
- How do you cancel a scheduled Thread in an ExecutorService?
- How to exercise your Daemons - Callable, Future, and ExecutorService
- ExecutorService and CountDownLatch Example
Answer
Simply because you have canceled it, and even interrupted it; it is still a running thread. It is not scheduled, so you are not canceling it before execution.Thursday, October 09, 2014
How do I check if a Class is an instanceof another Class without initializing it?
 |
| Illustration: Cathy Wilcox |
Class without doing an instanceof. This turned out to be a great learning experience. There were a couple of issues that needed to be resolved, first we were loading a Class by passing in its name using something similar to the line below:
This will load the Class, but from here how do we check that it is an instanceof without instantiating it?This can be solved by using
isAssignableFrom(Class clazz) as shown below. In this case we are checking if SolientGreen is Green. Some of you will find the moral paradox of being "Green" with Soilent Green.
The second issue is a more potential security problem. How do we load the
Class without initializing it. If the Class has a static initializer, the code is executed when the class is loaded. Alas, this is handled by using a variation of Class.forName(String name, boolean initialize, ClassLoader loader) which takes a boolean to determine if the class should be initialized, and a ClassLoader if you want to specify a specific loader.Finally, we can check the
Class like this:
When this is run, you will not see the message. Very nice indeed!So here is the remaining code for education and entertainment:
The code for the project can be downloaded from Bitbucket here: assignable
Thursday, July 10, 2014
A simple practical "pragmatic" Formatter for java.util.logging.Logger
I have quite a trove of code examples I have collected over the years. Here is another example of a
The next question is how do you use it? Easy enough... here is an example for you. The code for the project is located here: pragmatic-logging-formatter
Formatter used with the java.util.logging.Logger to generate a standard output.
PragmaticFormatter.java
The next question is how do you use it? Easy enough... here is an example for you. The code for the project is located here: pragmatic-logging-formatter
Creating a BLOB Image Table
I am going through some old code while I wait for my Windows VM to update. I came across some code to create an image BLOB table on MySQL. I thought I would publish it before deleting it from my system. It might be helpful to someone.
CreateImagesTable.java
cat: How do I list the contents of a text file?
I was asked by a new developer how you would
cat the contents of a file in Java. I thought for a second and here is what I came up with. I thought I would just share it. Note: This is my 30s answer, and probably could be cleaned up.
Cat.java
Thursday, May 01, 2014
Cross-Site Scripting (XSS) and Playing with JSoup
 Introduction
I have used Beautiful Soup with Python in the past for screen scraping. I was immediately excited at the possibilities. JSoup is a Java API for extracting data, and manipulating the DOM in HTML.
jsoup implements the WHATWG HTML5 specification, and parses HTML to the same DOM as modern browsers do.
I did a quick proof of concept just to see what it would do with my "dirty" code.
It results in an interesting output that could be useful if used properly. If you put in garbage, you will get "less" garbage out. It is better than nothing.
I decided that this still could be really useful especially combined with Hibernate Validators and JSF.
Hibernate Validator - @SafeHtml
I was looking at the Hibernate Validators to see about cleaning up some input from users to prevent XSS issues. I noticed that there was a validator called@SafeHtml(whitelistType=, additionalTags=, additionalTagsWithAttributes=). It uses the JSoup HTML parser.
Alas, I am full of sorrow. I can not seem to get the <code>@SafeHtml</code> annotation to work. GlassFish vomits and complains it can not find it. I even tried to add it to every
lib directory in GlassFish without success. Failing to succeed, I tried Tomcat 8 next. Again, nothing but bitterness and disappointment. It just will not get picked up.I tried looking for a working example of the validator, and didn't find any that worked. I am not sure of the what is going on, but if I can't figure it out. I imagine I am not alone. I just blog about it. ;-)
Undeterred
Well I decided that I didn't need Hibernate anyway! I feel like I should be in Aesop's Fables. I mentioned my Proof of Concept (POC) earlier. I figured I would look at trying to remove some<script /> tags from my code and even encoded them too to see what it would do. The whole point here is to help prevent XSS.Here is my Apache Maven project on BitBucket: jsoup-cleaner
Note: See the actual code for a more complete representation of the actual code I am trying to strip. The Syntaxhighlighter is having issues with the nested script tags. The same applies to the output.
I was surprised by the result actually. It stripped out the
<script /> tags, but totally missed the encoded tags. That is a major issue.
Improvements
I was looking for some solutions for the encoded JavaScript issue when I discovered a blog post called Jersey Cross-Site Scripting XSS Filter for Java Web Apps.This was not exactly what I needed, but it did contain a method which used JSoup and another framework called ESAPI. Enterprise Security API (ESAPI) was developed by OWASP to enhance the security of Enterprise applications. OWASP has a lot more than this framework. ESAPI can strip out the encoded bits to help prevent XSS.
I shamelessly used the following method from the blog post.
This does effectively remove any encoded
<script /> tags from the output. It does not however prevent errors in judgement on the part of the developer. For example taking the results of the output and using them directly in an HTML JavaScript attribute like onmouseover, or onclick.I created an example project called XSS Scripter's Delight which I demonstrated at the Greenville Java Users Group. It demonstrates what happens when you don't validate inputs from users. The name is satirical, but does demonstrate in a non-malicious way what you can do if you are not careful.
The Apache Maven project developed with NetBeans can be found on Bitbucket here: xss-scripters-delight.
Saturday, January 18, 2014
Java EE Tip of the Day: @WebFilter (Servlet Filter) Redirection
There is a common case to check a condition in a filter, and if the condition is not satisfied to redirect back to the context root of the application. This may be the case in a login filter, or a filter that performs some session management.
Here is a simple code example of how to perform the redirection:
Here is a simple code example of how to perform the redirection:
Thursday, January 16, 2014
How do you cancel a scheduled Thread in an ExecutorService?
 |
| Executors in the Middle Ages |
Callable and Future to demonstrate the concurrency libraries in Java.In the example, I use a
ExecutorService with a fixed thread pool size of two (2), to make the code slower to demonstrate the point. You can manipulate the value to see the effect on the code execution.The code is to demonstrate you can do it, there may be other cleaner ways of doing this. If you have an example, or idea on how to do it cleaner, please comment. :-)
Solution
The code for the project was developed using NetBeans and can be downloaded from Bitbucket at the link below. It is a NetBeans (Apache Ant) based project and should work with Ant without NetBeans.CallOrderCancel
CallOrderCancel.java
Tuesday, January 14, 2014
Unit Testing Example with Code Coverage using Cobertura
 |
| Cobertura Coverage in NetBeans 7.4 |
NetBeans will detect the addition of Cobertura in the POM file and automatically add menu items for checking code coverage. This is a very slick feature in NetBeans.
The Cobertura coverage shows 90% in the project because it does not handle the generics correctly at this time.
The Apache Maven based project can be downloaded from Bitbucket below:
unit-testing-demo
Here is an example snippet of the code.
ListDataStoreImplTest.java
Sunday, December 01, 2013
Minecraft Server on Amazon Elastic Compute Cloud (EC2)
Introduction
I recently setup a Minecraft Server on Amazon Elastic Compute Cloud (EC2) for one of my sons and his friend. It was an experiment for use with a larger group of Cub Scouts in my Bear den.I signed up for the free hosting for a year from Amazon. The free instance has some limitations, but will work fine. The biggest issue is the amount of ram in the free micro (t1.micro) instance is about 613MB. This is much smaller than the recommendation of 1024MB on the Minecraft website, but worked with a small group. You may need to go to the next tier (m1.small, or m1.medium) for a bigger group. Those instances are not in the free tier, but are $0.06/per hour, and $0.12/per hour respectively at the time of this writing.
The details below are simple, and are for use with an Linux based Amazon Machine Image (AMI). If you are not familiar with the terminology, it just means the operating system image for our virtual machine which we will be creating. You can create a Windows based AMI. The steps would be similar to the ones detailed below. If there is a need I may write another article on how to do it with a Windows AMI.
The process has a number of steps, but it actually takes about 5-8 minutes to get it setup. These directions are detailed just in case you need them.
Requirements
- You will need to have an SSH client installed on your computer. A mac has ssh built into the operating system. Windows users may use a free client like PuTTY.
- Java 7 Server JRE for Linux
- Minecraft application with a valid license
- Minecraft Multiplayer Server
Instructions
- Sign up for a free Amazon Web Services Account
- Sign-in to the Amazon Management Console and select EC2 from the list of services.

- You should see a screen similar to the one below. Please select a region closest to your location, e.g. I live in South Carolina so I will use US East (N. Virginia). This will reduce the network latency since it is closer.

- Next create a key-pair. These are the cryptographic keys used to login to the service.
The pem file that is downloaded should be kept in a safe location. You will need it later. I called my key pair Minecraft.


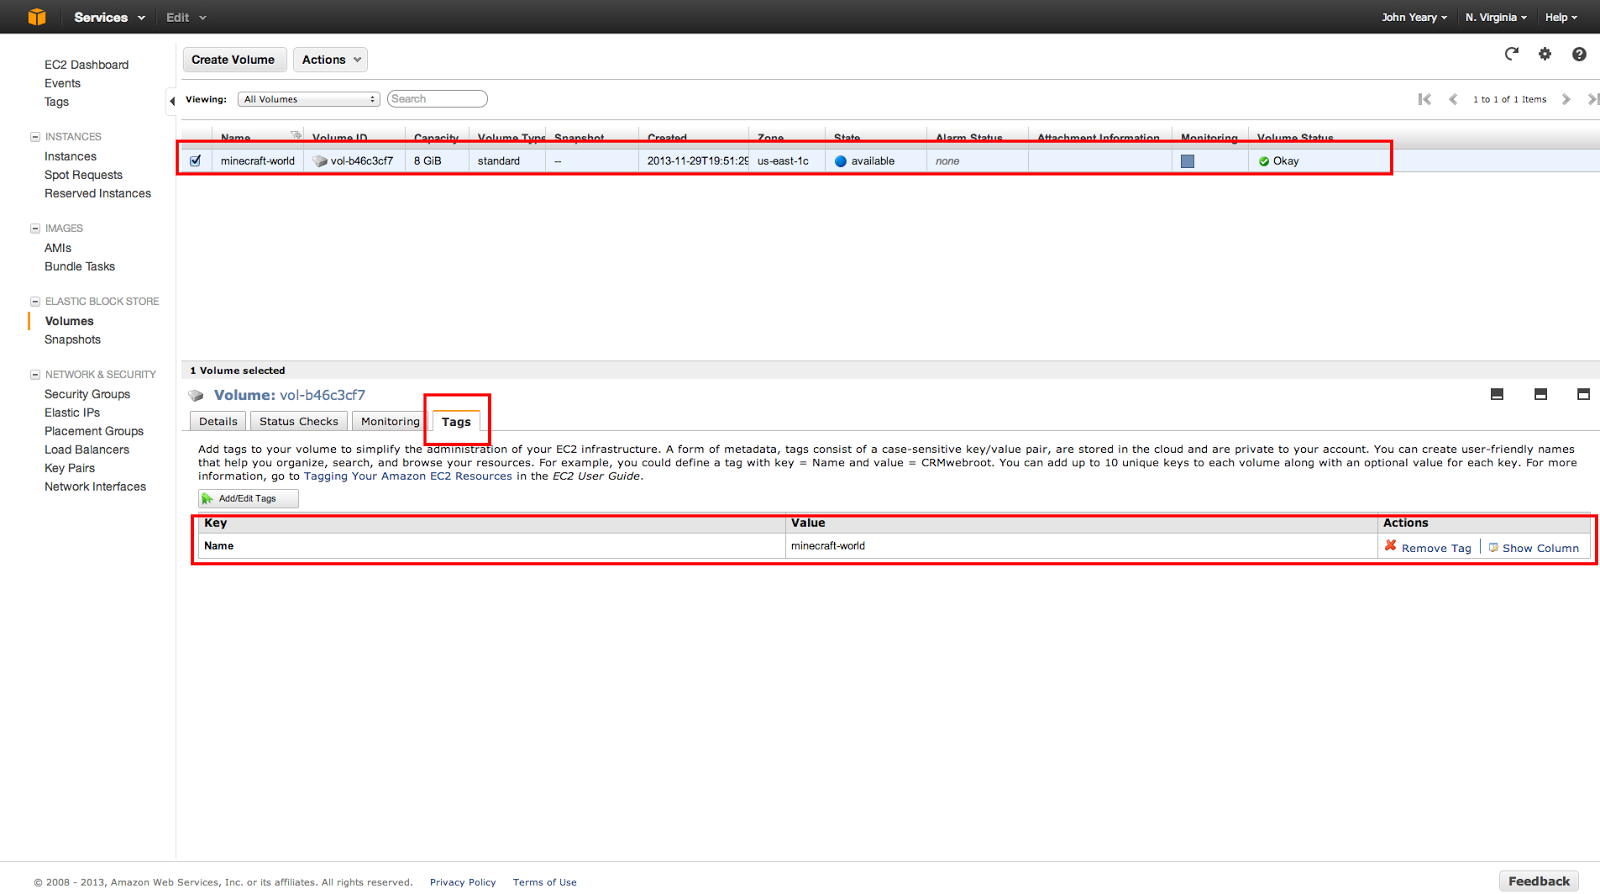
- Next select Volumes. We will be creating an Elastic Block Store (EBS) that will house our Java installation, and Minecraft server. The EBS will survive our instance being shutdown, and allow us to use it later if we want to run another game server. The maximum size for the free tier is 30GiB. We don't need anything that big. Create a volume in my case I will create one with the following values:
Volume Type: Standard
Size: 8 GiB
Availability Zone Any
Snapshot: No Snapshot
Once the volume is created, select it and go to the Tags tab and give it a name. I called mine minecraft-world. Write down the Availability Zone you selected, you will need this when you create your AMI.


- Next we will create our AMI instance. This will require a couple of steps in detail. Select Instances and Launch Instance.


- Select free instances, Ubuntu Server 13.10 (I also tested with Amazon Linux AMI 2013.09.1), 64-bit, and Select.

- Next: Configure Instance Details.

- Select the Availibility Zone that you chose for your EBS. In my case it is us-east-1c. Next: Add Storage.

- Next: Tag Instance

- Give the instance a name. I called mine Minecraft Server and Next: Configure Security Group.

- Note: This step is critical to get correct, otherwise you will not be able to connect to the instance. In my case, we are on a private LAN connected to a wireless router to the Internet. All of the boys connect to the router on their laptops via Wi-Fi. We will be using the EXTERNAL IP address of the router. Amazon should discover this automatically, if you select the source as My IP. Your circumstances may be different. If you have people connecting from remote locations, you will need them to provide their external IP addresses and add them as separate rules.
- Create a new security group
- Protocol: All TCP
- Port Range: 0-65535
- My IP: x.x.x.x/x (This should be auto-detected).
- Review and Launch

- Review the page, and select Launch.

- Select a key pair to use. We will use our Minecraft key and Launch Instances.

- Congrats you have setup and launched an EC2 instance!View Instances.

- You should see your instance running.

- Select Volumes again, and click on the minecraft-world volume you created earlier. Select Attach Volume from the Actions menu. Select the Minecraft Server instance, the device should default to /dev/sdf, and press Yes, Attach.


- Select the instances tab, select the Minecraft Server and press Connect. This will bring up a screen with connection instructions.

- Open a terminal, or connect to the instance using a tool like PuTTY using the instructions provided. When connecting you may get a warning about the key fingerprint, please choose yes.

- Once connected, we will need to setup our EBS store. Note: This will only need to be done once since it is the first time. If you are connecting subsequently skip to Step 21. In the terminal issue the following command:
This will create format our disk. - Mount it at the /mnt mount point on our os.
- Next we will open another terminal on computer and go to the directory where our Java Server JRE and Minecraft server instance jar is located. Use scp to copy the files to the server as shown below. Note: the address (the part after ubuntu@) will be the same as your connection string earlier. The :/home/ubuntu is directory we will copy it to.
- From our SSH terminal, we will copy the files from our /home/ubuntu directory to /mnt and configure them as follows.
- Next we will modify the .bashrc file to point to our new JAVA_HOME and add the JAVA_HOME to our PATH.
Add the following to the bottom of the file and save.
- Next we will set our new values in the shell, and check to see if Java is available.
You should see something like this that indicates that Java is correctly installed: - Finally we are ready to start the Minecraft server. The command below is for our current configuration. If you setup your server using a m1.small, or m1.medium instance as noted in the introduction, then use the the alternate command.
ALTERNATE server command for m1.small and m1.medium
You should see something like this:
- Test it out with your Minecraft Application using the public IP address of the server.


Congratulations, you have a Minecraft server!
Conclusion
Setting up a Minecraft server is easy and fun for adults and children alike. If you have questions, or comments please let me know.Saturday, November 30, 2013
How to use PowerMock and Mockito to test static and private methods
Introduction
This article is not another diatribe to tell you the importance of unit testing. I think we can all agree that it is important. This is about solving an issue that comes up frequently in unit testing. How do I test static methods, and how do you test private methods.Until PowerMock, most developers were told you can't really test a static method per se. I will show how to do it below.
A common mechanism for testing private methods is to change them to protected. This is not a good solution for a number of reasons. So how do we test them? Again, PowerMock has come to the rescue.
I want solutions. I use Arquillian, but I am not such a zealot that I will chant the mantra that mocking is evil and should not be done. It is a means to an end. That being said, we use Mockito which in my professional experience is the best current mocking framework available. It is easy to setup and use.
However, Mockito has its limitations. Two are mentioned above. The fine developers of PowerMock have come up with an additional framework to use in conjunction with Mockito to get around the limitations.
Solution
The Apache Maven sample code for the project was developed using NetBeans and can be found on Bitbucket here: unit-testing-mockito-powermockito.Since I am a Apache Maven user, I simply add the relevant frameworks to my
pom.xml as shown below:
Once the test frameworks are in place, I can use the PowerMockRunner to help me with my testing. The following are some simple classes to demonstrate how to test. The first is a class to generate UUID values for IDs.
IdentityUtilities.java
Next, I need a class to represent a person. I am interested in testing the private method
generateId.
Person.java
Finally, we need our
PersonTest class to test our Person object. The explanation follows the code.
PersonTest.java
The
@RunWith(PowerMockRunner.class) annotation tells jUnit that we are using an extension to handle testing of this class. This tells jUnit to use this test runner instead of its own test runner.
The
@PrepareForTest({IdentityUtilities.class, Person.class}) serves multiple purposes here. The first is to tell PowerMock that we need to do some preparation of the classes to instrument them for our testing. Classes defined using this annotation are typically those that needs to be byte-code manipulated. This includes final classes, classes with final, private, static or native methods that should be mocked and also classes that should be return a mock object upon instantiation. IdentityUtilities.class is our class with a static method, and Person.class contains our private method.
The first test
testInitialize() behaves like any other Mockito test with the exception that we mock it using PowerMockito.mockStatic(IdentityUtilities.class) to initialize it. This makes testing static methods as easy as any other Mockito test.
The second test requires a little more explanation. In this case, we spy on the object we are creating. This allows us to instrument it. Then using the "spied" instance we use
PowerMockito.when(instance, "generateId").thenReturn("UNIT-1A") to tell the framework that when the private method "generateId" is called, we want to return a specific value. Then we initialize the instance, and check the value is what we expected. Finally, we can optionally check to make sure that the method was actually called by using verifyPrivate(instance).invoke("generateId").
Conclusion
Don't short change yourself, and don't modify your beautifully architected code just to satisfy a testing framework. Find a framework like PowerMock to help you test your code as written instead. You should only change the code because you want to do so, or because you discover flaws in it.Monday, November 25, 2013
Java EE 7 Tip of the Day: Programmatic Control of Session Tracking with ServletContextListener
Have you ever had a developer modify a web.xml file to change session configuration? Have they forgotten to change it back from "developer mode" back to "deployment mode"? I am sure all of you have done something like that at some point in time. I am no exception. This tip of the day comes from that very issue.
The issue here is that we want to control session tracking. In the web.xml file you may have something that looks like:
OK, let me re-phrase that. You were expecting that, but instead you have:
This is a problem. You see we are trying to be more secure around our session and having the JSESSIONID in the URL is not helping much with that. Well, we can perhaps keep our application safe, and frustrate our developer slightly if he doesn't figure out this little bit of magic. We can control the session tracking programmatically in an "obvious" well-known location. We can enlist a
The ServletContextListener can help us by listening for when our application is being initialized, and set the session tracking back to COOKIE for us. The implementation is simple, and will help foil the "developer mode-itis" that sometimes infects the code.
The issue here is that we want to control session tracking. In the web.xml file you may have something that looks like:
OK, let me re-phrase that. You were expecting that, but instead you have:
This is a problem. You see we are trying to be more secure around our session and having the JSESSIONID in the URL is not helping much with that. Well, we can perhaps keep our application safe, and frustrate our developer slightly if he doesn't figure out this little bit of magic. We can control the session tracking programmatically in an "obvious" well-known location. We can enlist a
ServletContextListener to help us.The ServletContextListener can help us by listening for when our application is being initialized, and set the session tracking back to COOKIE for us. The implementation is simple, and will help foil the "developer mode-itis" that sometimes infects the code.
ServletContextListenerImpl.java
Note: Even if you didn't have a value set in the web.xml file, this would set it to COOKIE.Sunday, October 06, 2013
Lambda Expressions on Java SE 6
 Introduction
I attended a talk at JavaOne 2013 on Expression Language 3.0. It was a great talk by Ed Burns and Kin-man Chung about EL. EL 3.0 has been modular for a while, and can operate independently of the EE platform. I knew that, but this was a siren call reminder of that fact. During the talk, I asked a number of questions and for clarifications. One interesting clarification was that EL 3.0 was compiled using Java 7. This was following a discussion of the fact that it supports Lambda expressions. Wait... it uses Lambda expressions from Java 8 and is compiled using Java 7. I asked could it be compiled on Java 6. Kin-man Chung, the specification lead, told me that with some minor changes; "it should?" I took that as a challenge to try. I was successful and now I can do Lambda expressions on JDK 6.
When I mentioned that I was using this technique for Java 6 on Twitter, Michael Graciano pointed out that +Adam Bien had done something similar for Java 1.7. I am not sure if great minds think alike, or fools seldom differ on this one, but his article is a very cool read too.
@jyeary @RichardWarburto you mean something like this? http://t.co/CdaR29wJBw
— Michel Graciano (@mgraciano) October 2, 2013
Technical Details
The easiest way to try it out for yourself is to download the compiled version here: javax.el-3.0.0-custom.jarIf you want to create your own, then follow these easy steps.
- Download and install Java CC 6.0
- Download Java EL project using NetBeans Team Server on Java.net, or using Subversion: https://svn.java.net/svn/el-spec~source-code/tags/javax.el-3.0.0
- Open the impl directory and modify the build.xml file to point to your Java CC 6.0 directory, for example:
- Change the pom.xml to source and target level 1.6
- Change the version in the pom.xml so that it is distinguishable from the RI.
- Execute a mvn clean
- In the impl directory, execute ant. This will compile the parser code for EL.
Note: This is a very important step! - Modify the org.glassfish.el.test.ELProcessorTest, and remove all of the try with multicatch, and diamond operators.
- Execute mvn clean install.
If you were successful, you will have a version of EL 3.0 that will run on Java SE 6.
You can test your code using some of the examples found in the references below, or using the sample code snippet that uses some of the code from the references.
App.java
References
Subscribe to:
Posts
(
Atom
)
