How to Create Dynamic Intro Slider in Android using Firebase Firestore?
Last Updated :
20 Aug, 2024
We have seen creating a basic Intro Slider in Android which is used to inform our users regarding the features of our app and many more. In this article, we will take a look at the implementation of dynamic Intro Slider in our app with the help of Firebase. With the help of Firebase Firestore, we can change all the data dynamically from the Firebase Console. Now let's move towards the implementation.
What are we going to build in this project?
We will be building a simple Intro Slider in which we will load all the data from the Firebase Console and display that data in our slider. With the help of Firebase, we can dynamically update our data according to our requirements. A sample GIF is given below to get an idea about what we are going to do in this article. Note that we are going to implement this project using the Java language.

Step by Step Implementation
Step 1: Create a New Project
To create a new project in Android Studio please refer to How to Create/Start a New Project in Android Studio. Note that select Java as the programming language.
Step 2: Connect your app to Firebase
After creating a new project. Navigate to the Tools option on the top bar. Inside that click on Firebase. After clicking on Firebase, you can get to see the right column mentioned below in the screenshot.
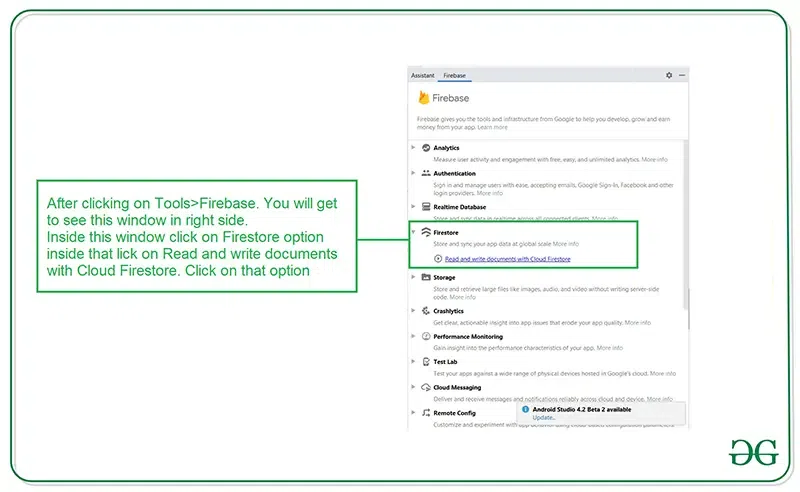
Inside that column Navigate to Firebase Cloud Firestore. Click on that option and you will get to see two options on Connect app to Firebase and Add Cloud Firestore to your app. Click on Connect now option and your app will be connected to Firebase. After that click on the second option and now your App is connected to Firebase. After connecting your app to Firebase you will get to see the below screen.

After that verify that dependency for the Firebase Firestore database has been added to our Gradle file. Navigate to app > Gradle Scripts inside that file check weather below dependency is added or not. If the below dependency is not present in your build.gradle file. Add the below dependency in the dependencies section.
implementation 'com.google.firebase:firebase-firestore:22.0.1'
implementation 'com.squareup.picasso:picasso:2.71828'
After adding this dependency sync your project and now we are ready for creating our app. if you want to know more about connecting your app to Firebase. Refer to this article to get in detail about How to add Firebase to Android App. As we are loading images from URL so we have to use Picasso.
Step 3: Adding permissions for the Internet
As we will be loading images from the URL, so we have to add permissions for the internet in your AndroidManifest.xml file. For adding permissions. Navigate to the app > AndroidManifest.xml file and add the below permissions.
XML
<!--Permissions for internet-->
<uses-permission android:name="android.permission.INTERNET" />
<uses-permission android:name="android.permission.ACCESS_NETWORK_STATE" />
Step 4: Working with the activity_main.xml file
Navigate to the app > res > layout > activity_main.xml and add the below code to that file. Below is the code for the activity_main.xml file.
XML
<?xml version="1.0" encoding="utf-8"?>
<LinearLayout
    xmlns:android="http://schemas.android.com/apk/res/android"
    xmlns:tools="http://schemas.android.com/tools"
    android:layout_width="match_parent"
    android:layout_height="match_parent"
    android:orientation="vertical"
    android:weightSum="5"
    tools:context=".MainActivity">

    <!--view pager for displaying our slides-->
    <androidx.viewpager.widget.ViewPager
        android:id="@+id/idViewPager"
        android:layout_width="match_parent"
        android:layout_height="0dp"
        android:layout_weight="4.5" />

    <LinearLayout
        android:layout_width="match_parent"
        android:layout_height="0dp"
        android:layout_weight="0.5"
        android:orientation="horizontal"
        android:weightSum="5">

        <View
            android:layout_width="0dp"
            android:layout_height="wrap_content"
            android:layout_weight="2" />

        <!--adding linear layout for creating dots view-->
        <LinearLayout
            android:id="@+id/idLLDots"
            android:layout_width="0dp"
            android:layout_height="wrap_content"
            android:layout_gravity="center_horizontal"
            android:layout_weight="1"
            android:gravity="center_horizontal"
            android:orientation="horizontal" />

        <!--button for skipping our intro slider-->
        <Button
            android:id="@+id/idBtnSkip"
            android:layout_width="0dp"
            android:layout_height="wrap_content"
            android:layout_gravity="center"
            android:layout_margin="10dp"
            android:layout_weight="2"
            android:background="@color/purple_500"
            android:backgroundTint="@color/purple_500"
            android:text="Skip"
            android:textAllCaps="false"
            android:textColor="@color/white" />

    </LinearLayout>

</LinearLayout>
Step 5: Creating a layout file for our slider item
Now we will create an item that we will be displaying in our slider. So for creating a new layout navigate to the app > res > layout > Right-click on it > Click on New > layout resource file and name it as slider_layout and add below code to it.
XML
<?xml version="1.0" encoding="utf-8"?>
<RelativeLayout
    xmlns:android="http://schemas.android.com/apk/res/android"
    android:layout_width="match_parent"
    android:layout_height="match_parent">

    <!--text view for displaying our heading-->
    <TextView
        android:id="@+id/idTVtitle"
        android:layout_width="match_parent"
        android:layout_height="wrap_content"
        android:layout_margin="20dp"
        android:padding="10dp"
        android:text="Slide 1"
        android:textAlignment="center"
        android:textColor="@color/black"
        android:textSize="20sp" />

    <!--Image view for displaying our slider image-->
    <ImageView
        android:id="@+id/idIV"
        android:layout_width="200dp"
        android:layout_height="200dp"
        android:layout_below="@id/idTVtitle"
        android:layout_centerHorizontal="true"
        android:layout_marginTop="50dp"
        android:padding="10dp"
        android:src="@mipmap/ic_launcher" />

    <!--text view for displaying our slider description-->
    <TextView
        android:id="@+id/idTVheading"
        android:layout_width="match_parent"
        android:layout_height="wrap_content"
        android:layout_below="@id/idIV"
        android:layout_marginStart="20dp"
        android:layout_marginTop="90dp"
        android:layout_marginEnd="20dp"
        android:padding="10dp"
        android:text="C++ data structure and ALgorithm Course"
        android:textAlignment="center"
        android:textSize="15sp" />

</RelativeLayout>
Step 6: Creating a Modal class for storing all the data for Slider items
For creating a new Modal class navigate to the app > java > your app's package name > Right-click on it and click on New > Java class and name it as SliderModal. After creating this class add the below code to it.
Java
public class SliderModal {

    // string variable for storing title,
    // image url and description.
    private String title;
    private String heading;
    private String imgUrl;

    public SliderModal() {
        // empty constructor is required
        // when using firebase
    }

    // creating getter methods.
    public String getTitle() {
        return title;
    }

    public void setTitle(String title) {
        this.title = title;
    }

    public String getHeading() {
        return heading;
    }

    // creating setter methods
    public void setHeading(String heading) {
        this.heading = heading;
    }

    public String getImgUrl() {
        return imgUrl;
    }

    public void setImgUrl(String imgUrl) {
        this.imgUrl = imgUrl;
    }

    // constructor for our modal class
    public SliderModal(String title, String heading, String imgUrl) {
        this.title = title;
        this.heading = heading;
        this.imgUrl = imgUrl;
    }
}
Step 7: Create an Adapter class for setting data to each view
For creating a new Adapter class. Navigate to the app > java > your app's package name > Right-click on it > New Java class > name it as SliderAdapter and add the below code to it. Comments are added inside the code to understand the code in more detail.
Java
import android.content.Context;
import android.view.LayoutInflater;
import android.view.View;
import android.view.ViewGroup;
import android.widget.ImageView;
import android.widget.RelativeLayout;
import android.widget.TextView;

import androidx.annotation.NonNull;
import androidx.viewpager.widget.PagerAdapter;

import com.squareup.picasso.Picasso;

import java.util.ArrayList;

public class SliderAdapter extends PagerAdapter {

    // creating variables for layout inflater,
    // context and array list.
    LayoutInflater layoutInflater;
    Context context;
    ArrayList<SliderModal> sliderModalArrayList;

    // creating constructor.
    public SliderAdapter(Context context, ArrayList<SliderModal> sliderModalArrayList) {
        this.context = context;
        this.sliderModalArrayList = sliderModalArrayList;
    }

    @Override
    public int getCount() {
        // inside get count method returning
        // the size of our array list.
        return sliderModalArrayList.size();
    }

    @Override
    public boolean isViewFromObject(@NonNull View view, @NonNull Object object) {
        // inside isViewFromobject method we are
        // returning our Relative layout object.
        return view == (RelativeLayout) object;
    }

    @NonNull
    @Override
    public Object instantiateItem(@NonNull ViewGroup container, int position) {
        // in this method we will initialize all our layout items
        // and inflate our layout file as well.
        layoutInflater = (LayoutInflater) context.getSystemService(context.LAYOUT_INFLATER_SERVICE);

        // below line is use to inflate the layout file which we created.
        View view = layoutInflater.inflate(R.layout.slider_layout, container, false);

        // initializing our views.
        ImageView imageView = view.findViewById(R.id.idIV);
        TextView titleTV = view.findViewById(R.id.idTVtitle);
        TextView headingTV = view.findViewById(R.id.idTVheading);

        // setting data to our views.
        SliderModal modal = sliderModalArrayList.get(position);
        titleTV.setText(modal.getTitle());
        headingTV.setText(modal.getHeading());
        Picasso.get().load(modal.getImgUrl()).into(imageView);

        // after setting the data to our views we
        // are adding the view to our container.
        container.addView(view);

        // at last we are returning the view.
        return view;
    }

    @Override
    public void destroyItem(@NonNull ViewGroup container, int position, @NonNull Object object) {
        // this is a destroy view method which
        // is use to remove a view.
        container.removeView((RelativeLayout) object);
    }
}
Step 8: Working with the MainActivity.java file
Go to the MainActivity.java file and refer to the following code. Below is the code for the MainActivity.java file. Comments are added inside the code to understand the code in more detail.
Java
import android.os.Bundle;
import android.text.Html;
import android.widget.LinearLayout;
import android.widget.TextView;
import android.widget.Toast;

import androidx.annotation.NonNull;
import androidx.appcompat.app.AppCompatActivity;
import androidx.viewpager.widget.ViewPager;

import com.google.android.gms.tasks.OnFailureListener;
import com.google.android.gms.tasks.OnSuccessListener;
import com.google.firebase.firestore.DocumentSnapshot;
import com.google.firebase.firestore.FirebaseFirestore;
import com.google.firebase.firestore.QuerySnapshot;

import java.util.ArrayList;
import java.util.List;

public class MainActivity extends AppCompatActivity {

    // creating variables for view pager,
    // LinearLayout, adapter and our array list.
    private ViewPager viewPager;
    private LinearLayout dotsLL;
    SliderAdapter adapter;
    private ArrayList<SliderModal> sliderModalArrayList;
    private TextView[] dots;
    int size;
    FirebaseFirestore db;

    @Override
    protected void onCreate(Bundle savedInstanceState) {
        super.onCreate(savedInstanceState);
        setContentView(R.layout.activity_main);
        db = FirebaseFirestore.getInstance();

        // initializing all our views.
        viewPager = findViewById(R.id.idViewPager);
        dotsLL = findViewById(R.id.idLLDots);

        // in below line we are creating a new array list.
        sliderModalArrayList = new ArrayList<>();
        loadDataFromFirebase();

        // calling method to add dots indicator
        addDots(size, 0);

        // below line is use to call on page
        // change listener method.
        viewPager.addOnPageChangeListener(viewListener);
    }

    private void loadDataFromFirebase() {

        // below line is use to get data from Firebase
        // firestore using collection in android.
        db.collection("SliderData").get()
                .addOnSuccessListener(new OnSuccessListener<QuerySnapshot>() {
                    @Override
                    public void onSuccess(QuerySnapshot queryDocumentSnapshots) {
                        // after getting the data we are calling on success method
                        // and inside this method we are checking if the received
                        // query snapshot is empty or not.
                        if (!queryDocumentSnapshots.isEmpty()) {
                            // if the snapshot is not empty we are hiding our
                            // progress bar and adding our data in a list.
                            List<DocumentSnapshot> list = queryDocumentSnapshots.getDocuments();
                            for (DocumentSnapshot d : list) {
                                // after getting this list we are passing
                                // that list to our object class.
                                SliderModal sliderModal = d.toObject(SliderModal.class);

                                // after getting data from Firebase we are
                                // storing that data in our array list
                                sliderModalArrayList.add(sliderModal);
                            }
                            // below line is use to add our array list to adapter class.
                            adapter = new SliderAdapter(MainActivity.this, sliderModalArrayList);

                            // below line is use to set our
                            // adapter to our view pager.
                            viewPager.setAdapter(adapter);

                            // we are storing the size of our
                            // array list in a variable.
                            size = sliderModalArrayList.size();
                        } else {
                            // if the snapshot is empty we are displaying a toast message.
                            Toast.makeText(MainActivity.this, "No data found in Database", Toast.LENGTH_SHORT).show();
                        }
                    }
                }).addOnFailureListener(new OnFailureListener() {
            @Override
            public void onFailure(@NonNull Exception e) {
                // we are displaying a toast message when
                // we get any error from Firebase.
                Toast.makeText(MainActivity.this, "Fail to load data..", Toast.LENGTH_SHORT).show();
            }
        });
    }

    private void addDots(int size, int pos) {
        // inside this method we are
        // creating a new text view.
        dots = new TextView[size];

        // below line is use to remove all
        // the views from the linear layout.
        dotsLL.removeAllViews();

        // running a for loop to add number
        // of dots to our slider.
        for (int i = 0; i < size; i++) {
            // below line is use to add the dots
            // and modify its color.
            dots[i] = new TextView(this);
            dots[i].setText(Html.fromHtml("•"));
            dots[i].setTextSize(35);

            // below line is called when the
            // dots are not selected.
            dots[i].setTextColor(getResources().getColor(R.color.white));
            dotsLL.addView(dots[i]);
        }
        if (dots.length > 0) {
            // this line is called when the dots
            // inside linear layout are selected
            dots[pos].setTextColor(getResources().getColor(R.color.purple_200));
        }
    }

    // creating a method for view pager for on page change listener.
    ViewPager.OnPageChangeListener viewListener = new ViewPager.OnPageChangeListener() {
        @Override
        public void onPageScrolled(int position, float positionOffset, int positionOffsetPixels) {

        }

        @Override
        public void onPageSelected(int position) {
            // we are calling our dots method to
            // change the position of selected dots.
            addDots(size, position);
        }

        @Override
        public void onPageScrollStateChanged(int state) {

        }
    };
}
After adding the above code add the data to Firebase Firestore in Android.
Step 9: Adding the data to Firebase Firestore in Android
Search for Firebase in your browser and go to that website and you will get to see the below screen.

After clicking on Go to Console option. Click on your project which is shown below.

After clicking on your project you will get to see the below screen. After clicking on this project you will get to see the below screen.

After clicking on Create Database option you will get to see the below screen.

Inside this screen, we have to select the Start in test mode option. We are using test mode because we are not setting authentication inside our app. So we are selecting Start in test mode. After selecting on test mode click on the Next option and you will get to see the below screen.

Inside this screen, we just have to click on Enable button to enable our Firebase Firestore database. After completing this process we have to add the data inside our Firebase Console. For adding data to our Firebase Console.
You have to click on Start Collection Option and give the collection name as SliderData. After creating a collection you have to click on Autoid option for creating the first document. Inside this create three fields as title, heading, and imgUrl and add values inside that fields. Add multiple documents in a similar way inside your Firebase Console. After that run your app and see the output of the app.

After adding this data to Firebase run your app and see the output of the app.
Output:
Similar Reads
How to Create Dynamic ListView in Android using Firebase Firestore?
ListView is one of the most used UI components in Android which you can find across various apps. So we have seen listview in many different apps. In the previous article, we have seen implementing ListView in Android using Firebase Realtime Database. Now in this article, we will take a look at the
9 min read
How to Create Dynamic Bottom Sheet Dialog in Android using Firebase Firestore?
Bottom Sheet Dialog is one of the famous Material UI Component which is used to display data or notifications in it. We can display any type of data or any UI component in our Bottom Sheet Dialog. In this article, we will take a look at the implementation of dynamic Bottom Sheet Dialog in Android us
7 min read
How to Create Dynamic Horizontal RecyclerView in Android using Firebase Firestore?
HorizontalRecyclerView is seen in many apps. It is generally used to display the categories in most apps and websites. This type of RecyclerView is seen in many E-commerce apps to indicate categories in the app. And this RecyclerView is also dynamic so that the admin can add or remove any item from
9 min read
How to Display Dynamic AlertDialog in Android using Firebase Firestore?
Dynamic AlertDialog is used in many different apps which are used to show different messages from dialog to the users. This type of dialog is also used for educating users with so many promotional banners. This type of alert dialog is generally dynamic and it displays images and texts which are dyna
7 min read
How to Create Dynamic WebView in Android with Firebase?
Converting a website into an application seems like a basic task to do on Android. With the help of WebView, we can show any webpage in our Android Application. We just have to implement the widget of WebView and add the URL inside the WebView which we have to load. So if you are looking for loading
6 min read
How to Update Data in Firebase Firestore in Android?
In the previous article, we have seen on How to Add Data to Firebase Firestore in Android, How to Read the data from Firebase Firestore in Android. Now we will see How to Update this added data inside our Firebase Firestore. Now we will move towards the implementation of this updating data in Androi
10 min read
How to Create Dynamic PDF Viewer in Android with Firebase?
If you are creating apps for students or for educational purposes then you need to add some PDF files for displaying some data inside our app. These PDF files are updated on regular basis. For loading this PDF from the server we prefer to use PDF Viewer which will load the PDF from the URL in Androi
7 min read
How to Read Data from Firebase Firestore in Android?
In the previous article, we have seen on How to Add Data to Firebase Firestore in Android. This is the continuation of this series. Now we will see How to Read this added data inside our Firebase Firestore. Now we will move towards the implementation of this reading data in Android Firebase. What w
9 min read
How to Delete Data from Firebase Firestore in Android?
In the previous article, we have seen on How to Add Data, Read Data, and Update data in Firebase Firestore in Android. Now we will see How to Delete this added data inside our Firebase Firestore. So we will move towards the implementation of this deleting data in Android Firebase. Â What we are goin
6 min read
How to Create a Dynamic Audio Player in Android with Firebase Realtime Database?
Many online music player apps require so many songs, audio files inside their apps. So to handle so many files we have to either use any type of database and manage all these files. Storing files inside your application will not be a better approach. So in this article, we will take a look at implem
7 min read