How To Run Python Script In Kubernetes Pod ?
Last Updated :
06 May, 2024
Execution of Python scripts helps in bringing the automation of work. Bringing these Python scripts into containerization as containerized applications will enhance the seamless performance and facilitate with high availability and scalability of the application. In this article, we guide you on how to make Python scripts as containerized applications and run those Python scripts in Kubernetes pods step by step effectively.
Understanding Of Primary Terminologies
- Kubernetes: It is an open-source container orchestration platform that helps with automating the deployments, scaling, and management of containerized applications.
- Pod: It is the smallest deployable unit in Kubernetes, it contains one or more containers with sharing command resources like storage and network.
- Python Script: It is a set of instructions written in the Python programming language that is used to perform specific tasks or functions.
A Step-By-Step Implementation Of Running Python Script In Kubernetes Pod
Step 1: Login In AWS Account
- Navigate to your AWS Account and provide your Username.
- AWS Account Login

- Provide the Password with respective to your Username.

Step 2: Create An Instance

Step 3: Choosing AMI
- Choose the AMI with name Amazon Linux 2 which is the latest version of Amazon Linux distribution and provide number of instances as 1 and instance name as "my_aws_instance".

Step 4: Choosing Key Pair
- Choose the existing the key pair, It helps in connecting the instance remotely from the local console with ssh protocol. Or else you can use choose without key pair option.

Step 5: Configuring Security Groups
- Configure the network security groups by clicking on edit option and provide the option values as shown in the below screenshot.

Step 6: Launching Instance
- After reviewing the definitions and configuration of the instance click on Launch Instance button.

Step 7: Connect Instance
- After creating the instance with name "my_aws_instance" , it will take some time to come for running state. After that Connect to the instance by clicking on connect button as shown in below screenshot.

Step 8: Navigate EC2 Console
- Click on the instance, navigate inside to it and go through EC2 Instance Connect section and click on connect to use EC2 Console.

Step 9: Switch To Root User
- After landing on the EC2 Console, Run the following command to switch to root user.
sudo su -

Step 10: Install Docker
- Now, install the docker software with running the following command:
yum install docker
- Enable the docker service with the following command:
systemctl enable docker --now

Step 11: Write Your Python Script
- Create or obtain the Python script you want to run in your Kubernetes pod. Ensure it's appropriately structured and contains the necessary functionality.

- Printing the python script file with cat command:

Step 12: Dockerize Your Python Script
FROM python:3.9-slim
# Set the working directory in the container
WORKDIR /app

# Copy the Python script into the container
COPY your_script.py /app/

# Install any dependencies required by your script
RUN pip install dependency1 dependency2

# Specify the command to run your script
CMD [ "python", "./your_script.py" ]

- Printing the dockerfile with cat command:

Step 13: Build Your Docker Image
- Build the Docker image using the Dockerfile:
docker build -t your-image-name .

- Changing the docker image with docker tag command:

Step 14: Push Your Docker Image to a Container Registry
- Push the built Docker image to a container registry like Docker Hub, Google Container Registry, or any other registry of your choice:
docker push your-image-name

Step 15: Deploy Your Python Script in a Kubernetes Pod
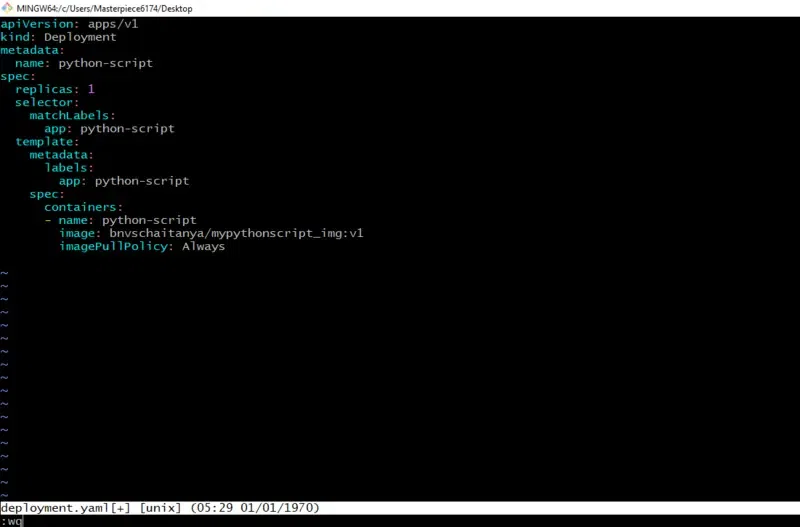
- Write a Kubernetes Deployment YAML file (`deployment.yaml`) to deploy your Docker image as a pod:
apiVersion: apps/v1
kind: Deployment
metadata:
  name: python-script
spec:
  replicas: 1
  selector:
    matchLabels:
      app: python-script
  template:
    metadata:
      labels:
        app: python-script
    spec:
      containers:
      - name: python-script
        image: your-image-name
        imagePullPolicy: Always
Step 16: Apply the Deployment Configuration
kubectl apply -f deployment.yaml

Step 17: Verify Deployment
- Verify that your deployment is running and check for any errors:
kubectl get pods
kubectl logs <pod-name>
Step 18: Monitor and Manage
- Monitor the logs of your pod to ensure your Python script is running as expected:
kubectl logs -f <pod-name>
- You can also manage your deployment by scaling it, updating the image, or deleting it as needed:
kubectl scale deployment python-script --replicas=3
kubectl set image deployment python-script python-script=your-new-image-name
kubectl delete deployment python-script
- That's it! Your Python script is now running in a Kubernetes pod.
Similar Reads
How to Resart Pod In kubernetes? Kubernetes is an open-source container orchestration tool that helps in scaling, deploying, and managing containerized applications. In Kubernetes, the pods are the smallest deployable unit. In this guide, I will first discuss what Kubernetes is. Then I will discuss what is pods in Kubernetes. After
5 min read
How To Install Python In Kubernetes Pod ? Deploying Python applications inside Kubernetes units offers influential solutions for managing and scaling containerized tasks at hand. Python, renowned for its straightforwardness, simplicity, and extensive system, tracks down the wide applicable in web improvement, data science, data visualizatio
8 min read
How to Install and Run MongoDB on Kubernetes? MongoDB is known as a document-oriented database server. A New York-based organization called 10 gen was building a platform as a service similar to window azure, and then developed MongoDB as a PAAS (Platform As A Service) in 2007 and later released it as an open source database. server in 2009 and
6 min read
How to Run a Python Script using Docker? Docker helps you to run your Python application very smoothly in different environments without worrying about underlying platforms. Once you build an image using dockerfile you can run that image wherever you want to run. Docker image will help you to package all the dependencies required for the a
8 min read
How to Integrate Podman with Kubernetes Podman is a daemonless container engine that manages and runs OCI containers on a Linux host. Podman Desktop provides developers with a graphical user interface for effortlessly managing and interacting with containers running Windows, macOS, and Linux. What is Podman?Podman is an open-source graphi
4 min read
How to Careate Static Pod in Kubernetes ? Static pods in Kubernetes make it simple to run pods directly on individual cluster nodes without the Kubernetes API server being involved. Not at all like ordinary pods oversaw by the Kubernetes control plane, static pods are characterized and overseen straight by the Kubelet, the essential node ag
7 min read