Implementing Message Queuing Technique in Netbeans Through Enterprise Java Beans
Last Updated :
28 Nov, 2022
A Message Queues, allow one or more processes to write a message to be read by other processes. A message queue is implemented as a linked list of messages and is stored within the Kernel. Each message queue is identified by a message queue identifier. The Kernel keeps track of all the message queues created in a system.
Procedure steps for Implementing Message Queuing Technique in Netbeans through Enterprise Java Beans are listed in sequential order. Simply follow these steps in order to implement message-driven bean in Netbeans as listed below:
- Open Netbeans and select Java EE --> Enterprise Application
- Enter Project Name in the corresponding textbox
- Select Glassfish server
- Click on Finish.
- Create a Message Driven Bean in the EJB component.
- Right-click on EJB and select the Message Driven Beans option and enter the EJB name and Package name and click on Add-in project Destination and create a destination resource.
- Enter Name and select Queue and click on OK and next.
- Now create a queue.Edit index.html file to create interaction with bean.
- Create a servlet for communicating bean
- Right-click on Application and select Clean and Build option.
Step 1: Open Netbeans and select Java EE->Enterprise Application
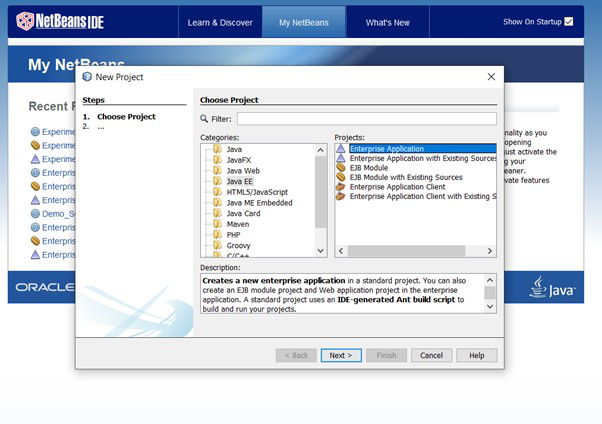 Choose Project as Java EE->Enterprise Application
Step 2: Enter Project Name in the corresponding textbox
 Enter Project Name
Step 3: Select Glassfish server
 Select Glashfish Server
Step 4: Click on Finish. Three Files will be created. 1. Application, 2. EJB and 3. War files are created


Step 5: Create a Message Driven Bean in the EJB component.
Step 6: Right-click on EJB and select the Message Driven Beans option and enter the EJB name and Package name and click on Add-in project Destination and create a destination resource.


Step 7: Enter Name and select Queue and click on OK and next.
Note: here we are implementing Queuing Technique, so the Destination Type should be Queue.


Step 8: Creating a queue
Implementation:
- To change this license header, choose License Headers in Project Properties.
- To change this template file, choose Tools | Templates
- And open the template in the editor.
Example
package amar;

import javax.ejb.ActivationConfigProperty;
import javax.ejb.MessageDriven;
import javax.jms.JMSDestinationDefinition;
import javax.jms.Message;
import javax.jms.MessageListener;
import javax.jms.TextMessage;


@JMSDestinationDefinition(name = "java:app/studentDemo", interfaceName = "javax.jms.Queue",
                                resourceAdapter = "jmsra", destinationName = "studentDemo")

@MessageDriven(activationConfig = {

    @ActivationConfigProperty(propertyName = "destinationLookup", propertyValue = "java:app/studentDemo")

    ,

    @ActivationConfigProperty(propertyName = "destinationType", propertyValue = "javax.jms.Queue")

})

// Class implementing MessageListener interface
public class Student implements MessageListener {

    // Constructor
    public Student() {}

    // Method 1
    // @Override
    public void onMessage(Message message) {

        // Try block to check for exceptions
        try {

            TextMessage msg = (TextMessage) message;

            System.out.println("This is the message retrieved from Queue:" + msg.getText());

            if (msg.getText() == "Abhin")

            {

                System.out.println("OK");

            } else {

                System.out.println("No");
            }
        }

        // Catch block to handle the exceptions
        catch (Exception e) {

            System.out.println("Error Message:" + e.getMessage());
        }
    }
}
Step 10: Edit index.html file to create interaction with bean.
Implementation: To change this license header, choose License Headers in Project Properties. To change this template file, choose Tools | Templates and open the template in the editor.
Example
<!DOCTYPE html>
<html>
   <head>
       <title>TODO supply a title</title>
       <meta charset="UTF-8">
       <meta name="viewport" content="width=device-width, initial-scale=1.0">
   </head>
   <body>
       <div>Message Driven Bean Project</div>
       <form action="Student_Demo" method="POST">
           <input type="text" name="msg"><br><!-- comment -->
           <input type="submit" value="Add"/>
       </form>
   </body>
</html>
Step 11: Create a servlet for communicating bean
Implementation:
- To change this license header, choose License Headers in Project Properties.
- To change this template file, choose Tools | Templates
- And open the template in the editor.
Example
package amar;

import java.io.IOException;
import java.io.PrintWriter;
import javax.annotation.Resource;
import javax.jms.Connection;
import javax.jms.ConnectionFactory;
import javax.jms.MessageProducer;
import javax.jms.Queue;
import javax.jms.Session;
import javax.jms.TextMessage;
import javax.servlet.ServletException;
import javax.servlet.annotation.WebServlet;
import javax.servlet.http.HttpServlet;
import javax.servlet.http.HttpServletRequest;
import javax.servlet.http.HttpServletResponse;


@WebServlet(name = "Student_Demo", urlPatterns = {"/Student_Demo"})

public class Student_Demo extends HttpServlet {

    @Resource(mappedName = "jms/__defaultConnectionFactory")

    ConnectionFactory cf;

    @Resource(mappedName = "java:app/studentDemo")

    Queue dest;


     // Processes requests for both
     // HTTP <code>GET</code> and <code>POST</code> methods

      // Servlet request
      //@param request
      // Servlet response
      //@param response

     // If a servlet-specific error occurs
     // @throws ServletException
     // If an I/O error occurs
     // @throws IOException


    protected void processRequest(HttpServletRequest request, HttpServletResponse response)

    throws ServletException, IOException {

        response.setContentType("text/html;charset=UTF-8");

        try (PrintWriter out = response.getWriter()) {

            // TODO output your page here
            // Sample code to be used here

            String msg = request.getParameter("msg");

            out.println("<!DOCTYPE html>");
            out.println("<html>");
            out.println("<head>");
            out.println("<title>Servlet Student_Demo</title>");
            out.println("</head>");
            out.println("<body>");

            send(msg);

            out.println("<h1>Message Queued</h1>");
            out.println("</body>");
            out.println("</html>");

        }

    }

    // Method
    private void send(String message) {


        try {

            // Creating object of Connection class
            Connection con = cf.createConnection();
            // Creating object of Session class
            Session ses = con.createSession();
            // Creating object of MessageProducer class
            MessageProducer mp = ses.createProducer(dest);
            // Creating object of TextMessage class
            TextMessage tm = ses.createTextMessage();

            tm.setText(message);

            mp.send(tm);

        }

        // Catch block to handle the exception
        catch (Exception e) {

            System.out.println("Error" + e.getMessage());

        }

    }

    // <editor-fold defaultstate="collapsed" desc="HttpServlet methods.
    // Click on the + sign on the left to edit the code.">

    /**

     * Handles the HTTP <code>GET</code> method.

     *

     * @param request servlet request

     * @param response servlet response

     * @throws ServletException if a servlet-specific error occurs

     * @throws IOException if an I/O error occurs

     */

    @Override

    protected void doGet(HttpServletRequest request, HttpServletResponse response)

    throws ServletException, IOException {

        processRequest(request, response);

    }

    /**

     * Handles the HTTP <code>POST</code> method.

     *

     * @param request servlet request

     * @param response servlet response

     * @throws ServletException if a servlet-specific error occurs

     * @throws IOException if an I/O error occurs

     */

    @Override

    protected void doPost(HttpServletRequest request, HttpServletResponse response)

    throws ServletException, IOException {

        processRequest(request, response);

    }

    /**

     * Returns a short description of the servlet.

     *

     * @return a String containing servlet description

     */

    @Override

    public String getServletInfo() {

        return "Short description";

    }// </editor-fold>

}
Step 12: Right-click on Application and select Clean and Build option. It will clean the project and Built successfully. After Building successfully select Deploy. If any error in deploy it shows all those errors. Once Deploy is successful to hit the run button for the execution process.
Output:
 User interface
 Message is Queued to Glashfish Server
 Message Queued Information
Similar Reads
Java Program to Implement the Queue Data Structure
Queue is the fundamental data structure that follows the First-In-First-Out(FIFO) principle where the element that is inserted first is one that gets removed first. Imagine the queue of the people waiting in the line at the ticket counter: the person who arrives the first gets served first and so on
4 min read
Queue Implementation Using Linked List in Java
Queue is the linear data structure that follows the First In First Out(FIFO) principle where the elements are added at the one end, called the rear, and removed from the other end, called the front. Using the linked list to implement the queue allows for dynamic memory utilization, avoiding the cons
4 min read
How to Execute SQL File with Java using File and IO Streams?
In many cases, we often find the need to execute SQL commands on a database using JDBC to load raw data. While there are command-line or GUI interfaces provided by the database vendor, sometimes we may need to manage the database command execution using external software. In this article, we will le
5 min read
Distributed Objects in EJB(Enterprise Java Beans) - Explicit vs Implicit Middleware
A distributed object is an object that is callable from a remote system. An in-process client, an out-process client, or an elsewhere located client (on a network) can call it. The following figure shows how a client can call a distributed object. Stub is a client-side proxy object. It masks the net
5 min read
LinkedTransferQueue getWaitingConsumerCount() method in Java with Examples
The java.util.concurrent.LinkedTransferQueue.getWaitingConsumerCount() method returns the number of consumers waiting to receive elements via take() or timed poll, from the LinkedTransferQueue(LTQ). Consumers here will read elements from the LTQ. Producers will add elements to the LTQ. This method w
3 min read
LinkedTransferQueue hasWaitingConsumer() method in Java
The Java.util.concurrent.LinkedTransferQueue.hasWaitingConsumer() method always returns true if there is at least one consumer in the queue waiting to receive an element via BlockingQueue.take() or timed poll. The returned value represents a momentary state of affairs. Syntax public boolean hasWaiti
3 min read
LinkedTransferQueue forEach() method in Java with Examples
The forEach() method of Java.util.concurrent.LinkedTransferQueue is an in-built function in Java which is used to traverse each element in this queue. Syntax: public void forEach(Consumer<E> action) Parameters: This method takes a parameter action which represents the action to be performed fo
2 min read
LinkedTransferQueue tryTransfer() method in Java with Examples
The tryTransfer() method of class LinkedTransferQueue is an inbuilt function in Java which is generally used to transfer an element to a thread which is waiting to receive it, if in case there is no thread waiting then it will terminate without adding element into the queue or you can also make it w
5 min read
LinkedBlockingDeque in Java with Examples
The LinkedBlockingDeque class in Java is a part of the Java Collection Framework. It was introduced in JDK 1.6 and it belongs to java.util.concurrent package. It is a Deque(Doubly Ended Queue) which blocks a thread if that thread tries to take elements out of it while the Deque is empty. It implemen
14 min read
LinkedBlockingQueue put() method in Java with Examples
The put(E e) method of LinkedBlockingQueue inserts element passed as parameter to method at the tail of this LinkedBlockingQueue, if queue is not full. If the queue is full, then this method will wait for space to become available and after space is available, it inserts the element to LinkedBlockin
3 min read