


Reacting to drag-and-drop events
Creating a drag-and-drop component for file uploads is quite a common task for a web developer. If you’ve ever worked on such a component, you may already know that it isn’t a trivial task and that there’s a lot of hidden complexity behind a component like this. Luckily for us, we have RxJS to help us streamline the experience of reacting to drag-and-drop events in a reactive and declarative way.
Getting ready
In this recipe, to provide support for tracking image upload progress, we need to run a small Node.js server application located in the server folder. We can run this server application by using the following command:
node index.js
After that, we’re ready to go to the client folder and dive into the reactive drag-and-drop component.
How to do it…
In this recipe, we’ll define a drag-and-drop area for .png images. Then, we’ll add support for multiple uploads to be made at the same time, show the upload progress of each image, and display error messages if the format of the image isn’t correct. We’ll also implement a retry mechanism in case a file upload fails over the network.
Step 1 – Defining a dropzone
In our dnd-file-upload.component.html file, we must place markup for the dropzone area:
<div #dropzoneElement class="drop-zone-element">
    <p>Drag and drop png image into the area below</p>
</div>
After getting the dropzoneElement reference with @ViewChild(), we can start reacting to the drag-and-drop events in the dropzone area:
@ViewChild('dropzoneElement') dropzoneElement!: ElementRef;
ngAfterViewInit(): void {
    const dropzone = this.dropzoneElement.nativeElement;
    const dragenter$ = fromEvent<DragEvent>(
        dropzone,
        'dragenter'
    );
    const dragover$ = fromEvent<DragEvent>(
        dropzone,
        'dragover'
    ).pipe(
        tap((event: DragEvent) => {
            event.preventDefault();
            event.dataTransfer!.dropEffect = 'copy';
            (event.target as Element).classList.add('dragover');
        })
    );
    const dragleave$ = fromEvent<DragEvent>(
        dropzone,
        'dragleave'
    ).pipe(
        tap((event: DragEvent) => {
            (event.target as Element).classList.remove('dragover');
        })
    );
    const drop$ = fromEvent<DragEvent>(
        dropzone,
        'drop'
    ).pipe(
        tap((event: DragEvent) => {
            (event.target as Element).classList.remove('dragover');
        })
    );
    const droppable$ = merge(
        dragenter$.pipe(map(() => true)),
        dragover$.pipe(map(() => true)),
        dragleave$.pipe(map(() => false))
    );
}
While creating these events, we can track when the file(s) have entered the dropzone and when they’re leaving. Based on this, we can style the component by adding the corresponding classes. We’ve also defined all droppable even so that we know when to stop reacting to the stream of new images that’s being dragged over.
Step 2 – Validating files
Now, we can hook into a stream of drop events and validate the format of each image; if the format is OK, we can start uploading each image to the backend API:
drop$.pipe(
    tap((event) => event.preventDefault()),
    switchMap((event: DragEvent) => {
        const files$ = from(Array.from(
            event.dataTransfer!.files));
        return this.fileUploadService.validateFiles$(
            files$);
    }),
  ...the rest of the stream
Back in our FileUploadService service, we have a validation method that checks whether we’ve uploaded a .png image:
validateFiles$(files: Observable<File>): Observable<{
    valid: boolean,
    file: FileWithProgress
}> {
    return files.pipe(
        map((file File) => {
            const newFile: FileWithProgress = new File(
                [file],
                file.name,
                { type: file.type }
            );
            if (file.type === 'image/png') {
                newFile.progress = 0;
            } else {
                newFile.error = 'Invalid file type';
            }
        return newFile;
        }),
        map((file: FileWithProgress) => {
            return of({
                valid: !file.error,
                file
            });
        }),
        mergeAll()
    );
}
Here, we check the file type. If it’s expected, we set the progress to 0 and start the upload. Otherwise, we set the error message for that specific file upload.
Step 3 – Uploading files and tracking progress
Once we’ve validated each file, we can start upload them to the backend:
drop$.pipe(
    // validation steps from Step 1
    map((file: FileWithProgress) =>
        this.fileUploadService.handleFileValidation(file)
    ),
    mergeAll(),
    takeUntil(droppable$
        .pipe(filter((isDroppable) => !isDroppable))
    ),
    repeat()
)
handleFileValidation$(file: FileWithProgress):
    Observable<FileWithProgress | never> {
        if (!file.valid) {
            this._snackBar.open(
                `Invalid file ${file.name} upload.`,
                'Close',
                { duration: 4000 }
            );
        return EMPTY;
    }
    return this.fileUploadService
        .uploadFileWithProgress$(file);
}
If the file is invalid, we’ll immediately return that file and show the error in the UI:

Figure 2.7: Invalid file format upload
If it’s a valid file upload, then we initiate an upload request to our API. In Angular, if we want to track the actual progress of a request, there are a few things we must do:
- We need to send the request payload as
FormData. - We need to set
responseTypeto'blob'. - We need to set the
reportProgressflag totrue.
After applying all these steps, our uploadFiles$ method should look like this:
uploadFile$(file: File): Observable<number> {
    const formData = new FormData();
    formData.append('upload', file);
    const req = new HttpRequest(
        'POST', '/api/recipes/upload', formData, {
            reportProgress: true,
            responseType: 'blob'
        }
    );
    return this.httpClient.request(req).pipe(
        map((event: HttpEvent<Blob>) =>
            this.getFileUploadProgress(event)),
        filter(progress => progress < 100),
    );
}
Now, when we send this request, we’ll get a series of HTTP events that we can react to. If we check the getFileUploadProgress method, we’ll see this in action:
getFileUploadProgress(event: HttpEvent<Blob>): number {
    const { type } = event;
    if (type === HttpEventType.Sent) {
        return 0;
    }
    if (type === HttpEventType.UploadProgress) {
        const percentDone = Math.round(
            100 * event.loaded / event.total!);
        return percentDone;
    }
    if (type === HttpEventType.Response) {
        return 100;
    }
    return 0;
}
With this approach, we know the exact progress of the file upload due to the UploadProgress event.
Finally, we can call the uploadFileWithProgress$ method from our service and return each file with progress information attached to each corresponding file:
uploadFileWithProgress$(file: FileWithProgress):    Observable<FileWithProgress> {
    return this.uploadFile$(file).pipe(
        map((progress: number) =>
            this.createFileWithProgress(file, progress)),
        endWith(this.createFileWithProgress(file, 100))
    );
}
After emitting a progress value, we’ll return the file with information attached about its progress so that we can display it in the UI.
Step 4 – Showing file uploads in the UI
Finally, once we subscribe to this whole stream of file upload events inside of our component, we can show the list of all the files that are being uploaded with corresponding progress bars. This also allows us to show an error message if an error has occurred:
drop$.pipe(
    // validation steps from Step 1
    // file upload steps from Step 2
).subscribe({
    next: (file) => {
        if (file.valid) {
            this.validFiles.set(file.name, file);
            return;
        }
        if (!file.valid) {
            this._snackBar.open(
                'Invalid file upload.',
                'Close',
            {}
            );
        }
    }
});
Once we open our browser and drag multiple valid .png images, we can handle those uploads concurrently and observe their progress:

Figure 2.8: A reactive drag-and-drop file upload
Step 5 – Handling file upload errors
Imagine that, in the middle of our image upload, the network fails. One of the key aspects of a component like this is that it must be resilient to these kinds of errors and provide a recovery or retry mechanism. We can do this by catching that network error in the file upload stream and showing a retry button in the UI next to the failed upload. We can extend our service method by adding an error catch mechanism:
uploadFileWithProgress$(file: FileWithProgress): Observable<FileWithProgress> {
    return this.uploadFile$(file).pipe(
        map((progress: number) =>
            this.createFileWithProgress(file, progress)),
        endWith(this.createFileWithProgress(file, 100)),
        catchError(() => {
            const newFile: FileWithProgress =
                this.createFileWithProgress(
                    file,
                    -1,
                    'Upload failed'
                );
            return of(newFile);
        })
    );
}
Back in our component template, dnd-file-upload.component.html, we can add a retry button if the file’s upload progress is at –1, meaning that it failed previously:
@if (file.value.progress !== -1) {
    {{ file.value.progress }}%
} @else {
    <button
        mat-icon-button
        (click)="retryUpload(file.value)"
        >
        <mat-icon aria-hidden="false" fontIcon="redo">
        </mat-icon>
    </button>
}
retryUpload(file: FileWithProgress): void {
    this.recipeService.uploadFileWithProgress$(
        file).subscribe({ next: (file: FileWithProgress) =>
            this.validFiles.set(file.name, file),
            error: (err) => console.error(err),
        });
}
If we open our browser, if an upload error has occurred, we may notice the retry button in the UI. If the network recovers, we can trigger another upload request for the failed uploads:
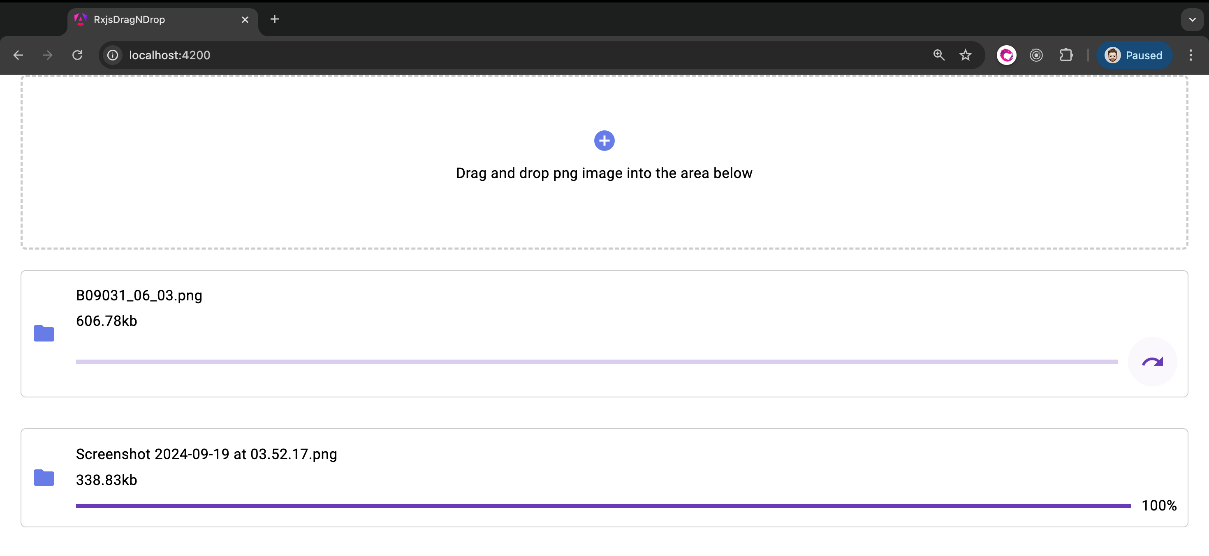
Figure 2.9: Retry on file upload
See also
- The HTML
inputfile: https://developer.mozilla.org/en-US/docs/Web/HTML/Element/input/file - The
intervalfunction: https://rxjs.dev/api/index/function/interval - The
repeatoperator: https://rxjs.dev/api/operators/repeat - The
scanoperator: https://rxjs.dev/api/operators/scan - The
finalizeoperator: https://rxjs.dev/api/operators/finalize - The
mergeoperator: https://rxjs.dev/api/operators/merge - The
mergeAlloperator: https://rxjs.dev/api/operators/mergeAll - The
endWithoperator: https://rxjs.dev/api/operators/endWith


