


![21
●
Dynamic typing
# This is a comment
i = 3 # assign 3 to variable i
i = [1, 2, 3, 4, 5] # assign a list to i
print(i[2]) # print the 3rd element
i = "abcde" # assign a string to i
print(i[2]) # print the 3rd character
Variable, Object, Type, Comment](https://image.slidesharecdn.com/raspberry-pi-gpio-tutorial-en-190902223232/85/Raspberry-Pi-GPIO-Tutorial-Make-Your-Own-Game-Console-21-320.jpg)


![24
●
Iterator
for i in range(start, stop[, step]):
process
for i in range(0, 11, 5):
print(i)
Loop](https://image.slidesharecdn.com/raspberry-pi-gpio-tutorial-en-190902223232/85/Raspberry-Pi-GPIO-Tutorial-Make-Your-Own-Game-Console-24-320.jpg)


![27
●
1. Execute the script file
●
$ nano test.py
●
$ python3 test.py
●
2. Execute interactively
●
$ python3
Python 3.5.3 (default, Sep 27 2018, 17:25:39)
●
[GCC 6.3.0 20170516] on linux
Type "help", "copyright", "credits" or
"license" for more information.
>>>
Execution Modes](https://image.slidesharecdn.com/raspberry-pi-gpio-tutorial-en-190902223232/85/Raspberry-Pi-GPIO-Tutorial-Make-Your-Own-Game-Console-27-320.jpg)


![163
spi = spidev.SpiDev()
spi.open(0,0) # (0,0) indicates CE0 and /dev/spidev0.0
spi.max_speed_hz = 1800000 # 10kHz to 3.6 MHz
●
●
def ReadChannel(channel):
adc = spi.xfer2([1,(8+channel)<<4,0])
data = ((adc[1]&3) << 8) + adc[2]
return data
def ConvertVolts(data,places):
volts = (data * 3.3) / float(1023)
volts = round(volts,places)
return volts
light_channel = 0
delay = 1
while True:
light_level = ReadChannel(light_channel)
light_volts = ConvertVolts(light_level, 2)
print("Light:{} ({}V)".format(light_level,light_volts))
time.sleep(delay)](https://image.slidesharecdn.com/raspberry-pi-gpio-tutorial-en-190902223232/85/Raspberry-Pi-GPIO-Tutorial-Make-Your-Own-Game-Console-163-320.jpg)

![165
●
Input consists of 3 bytes
●
# byte 1: the start bit (always 0x01)
●
# byte 2: configure bits
●
# byte 3: don't care
●
spi.xfer2([1,(8+channel)<<4,0])
●
Ch0 = 1000 0000
●
Ch1 = 1001 0000
Understand spi.xfer2()
0x01 don't careCh0/Ch1](https://image.slidesharecdn.com/raspberry-pi-gpio-tutorial-en-190902223232/85/Raspberry-Pi-GPIO-Tutorial-Make-Your-Own-Game-Console-165-320.jpg)


![189
spi = spidev.SpiDev()
●
spi.open(0,0)
●
spi.max_speed_hz = 1800000
●
●
def ReadChannel(channel):
●
adc = spi.xfer2([1,(8+channel)<<4,0])
●
data = ((adc[1]&3) << 8) + adc[2]
●
return data
●
●
vrx_channel = 1
●
vry_channel = 2
●
●
while True:
●
vrx_pos = ReadChannel(vrx_channel)
●
vry_pos = ReadChannel(vry_channel)
●
●
print("X : {} Y : {} ".format(vrx_pos,vry_pos))
●
●
time.sleep(0.5)](https://image.slidesharecdn.com/raspberry-pi-gpio-tutorial-en-190902223232/85/Raspberry-Pi-GPIO-Tutorial-Make-Your-Own-Game-Console-189-320.jpg)


![213
●
Add a line (highlighted yellow)
●
$ sudo nano /etc/rc.local
sudo python /home/pi/gpio-game-console/13-
gaming_console/gaming_console.py &
# Print the IP address
_IP=$(hostname -I) || true
if [ "$_IP" ]; then
printf "My IP address is %sn" "$_IP"
fi
exit 0
Key-press Mapper at Boot
Note: a single line](https://image.slidesharecdn.com/raspberry-pi-gpio-tutorial-en-190902223232/85/Raspberry-Pi-GPIO-Tutorial-Make-Your-Own-Game-Console-213-320.jpg)


![224
●
Set display resolution to 256x240x60
●
TAB-key to activate the menu, choose
[Video Mode], ESC-key to leave
My AdvanceMAME is Slooow](https://image.slidesharecdn.com/raspberry-pi-gpio-tutorial-en-190902223232/85/Raspberry-Pi-GPIO-Tutorial-Make-Your-Own-Game-Console-224-320.jpg)
![225
●
Set display resolution to 256x240x60
●
TAB-key to activate the menu, choose
[Video Mode], ESC-key to leave
My AdvanceMAME is Slooow](https://image.slidesharecdn.com/raspberry-pi-gpio-tutorial-en-190902223232/85/Raspberry-Pi-GPIO-Tutorial-Make-Your-Own-Game-Console-225-320.jpg)
![226
●
Set display resolution to 256x240x60
●
TAB-key to activate the menu, choose
[Video Mode], ESC-key to leave
My AdvanceMAME is Slooow](https://image.slidesharecdn.com/raspberry-pi-gpio-tutorial-en-190902223232/85/Raspberry-Pi-GPIO-Tutorial-Make-Your-Own-Game-Console-226-320.jpg)
Raspberry Pi GPIO Tutorial - Make Your Own Game Console
- 1. 1 Workshop on Raspberry Pi Game Console Join the Maker World by GPIO Applications sosorry <[email protected]>
- 2. ● Thanks for Department of Innovative Information and Technology, Tamkang University, who has contributed to the translations. ● 淡江大學 / 資訊創新與科技學系 http://www.iit.tku.edu.tw/ Credits
- 3. CC BY — CC BY-NC — CC BY-SA CC (Creative Commons) Attribution — This license lets others distribute, remix, tweak, and build upon your work, even commercially, as long as they credit you for the original creation. Attribution-NonCommercial — This license lets others remix, tweak, and build upon your work non-commercially, and although their new works must also acknowledge you and be non-commercial, they don’t have to license their derivative works on the same terms. Attribution-ShareAlike — This license lets others remix, tweak, and build upon your work even for commercial purposes, as long as they credit you and license their new creations under the identical terms.
- 4. 4 ● Raspberry Pi Approved Reseller About Us
- 5. ● Dedicated to Raspberry Pi Application & Promotion ● Advocated to Raspberry Pi User Group: Meetings/Workshops/Studies/Hackathon User Group x Activity
- 6. 6 ● COSCUP, MakerConf, PyCon Speaker ● Slides ● http://www.slideshare.net/raspberrypi- tw/presentations ● Source Code ● https://github.com/raspberrypi-tw Share x Tutorial
- 7. 7
- 8. 8 ● Introduction of Raspberry Pi GPIO ● Environment Setup ● Input / Output ● Digital / Analog ● Practices & Implementations Outlines
- 9. 9 ● Learn Circuit Fundamentals ● Learn How to Program According to the Datasheets ● Make Your Own Game Console Goals
- 10. 10 ● Hardware: Raspberry Pi 3B/3B+ ● O.S.: 2019-04-08-raspbian-stretch-full.img ● To use USB-to-TTL calble ● Add 3 lines to /boot/config.txt – dtoverlay=pi3-miniuart-bt – core_freq=250 – enable_uart=1 ● Delete “quiet” from /boot/cmdline.txt Environment Add Delete
- 11. 11 ● $ sudo apt-get update ● $ sudo apt-get install -y x11vnc python-dev python-pip libsdl1.2-dev ● $ sudo pip install spidev evdev Packages
- 12. 12 Introduction of Raspberry Pi GPIO
- 13. 13 ● General Purpose Input Output ● Digital Signal Controlled by Software What is GPIO? http://www.tek.com/datasheet/tps2000b-series-digital-storage-oscilloscopes-datasheet
- 14. 14 ● Input or Output ● Output : Write the value to a pin ● Input : Read the value from a pin ● Waiting for an interrupt ● Rising or Falling Edge Trigger What to Control?
- 15. 15 Where are the GPIO Pins? http://www.raspberrypi-spy.co.uk/ Pin1 Pin2 Pin25 Pin26 Pin3 Pin4Z Zig-zag Order
- 16. 16 ● GPIO output HIGH is 3.3V ● GPIO max input voltage is 3.3V ● A single-pin output current is 3mA-16mA ● Max total output current is 50mA ● GPIO input LOW is ≤0.8V, input HIGH is ≥1.3V Some GPIO Properties https://www.scribd.com/doc/101830961/GPIO-Pads-Control2
- 17. 17 ● C ● C + wiringPi ● C# ● Ruby ● Perl ● Python ● Scratch ● Java Pi4J Library ● Shell script Controlling Raspberry Pi GPIO
- 18. 18 ● Python + RPi.GPIO = 70 kHz ● C + BCM 2835 = 5.4 MHz ● Ruby + wiringpi bindings = 21 kHz GPIO Benchmark http://www.tek.com/datasheet/tps2000b-series-digital-storage-oscilloscopes-datasheet
- 19. 19 Python + GPIO
- 20. 20 ● Variable, Object, Type, Comment ● Module ● Indentation ● Loop ● Conditional Selection ● Function Python3 Quick Start
- 21. 21 ● Dynamic typing # This is a comment i = 3 # assign 3 to variable i i = [1, 2, 3, 4, 5] # assign a list to i print(i[2]) # print the 3rd element i = "abcde" # assign a string to i print(i[2]) # print the 3rd character Variable, Object, Type, Comment
- 22. 22 # import MODULE import RPi.GPIO # import MODULE as ALIAS import RPi.GPIO as GPIO Module
- 23. 23 ● Indentation is significant ● A block indents at the same level ● Use white spaces instead of TAB ● Popular style: 4 white spaces Indentation
- 24. 24 ● Iterator for i in range(start, stop[, step]): process for i in range(0, 11, 5): print(i) Loop
- 25. 25 if condition_1: process_1 elif condition_2: process_2 else: process_3 process_4 Conditional Selection
- 26. 26 def function_name(): process def function_name(param_name): process def function_name(param_name = 3): process Function
- 27. 27 ● 1. Execute the script file ● $ nano test.py ● $ python3 test.py ● 2. Execute interactively ● $ python3 Python 3.5.3 (default, Sep 27 2018, 17:25:39) ● [GCC 6.3.0 20170516] on linux Type "help", "copyright", "credits" or "license" for more information. >>> Execution Modes
- 28. 28 Beginner’s Pack ● Red/Yellow/Green LED x2 ● 1/4W resistor, 1Kx5,2Kx5 ● Breadboard x1 ● Button x4 ● Buzzer x2 ● Passive infrared (PIR) sensor x1 ● Tilt switch x1 ● MCP3008 ADC IC x1 ● Photoresistor x1 ● XY joystick x1 ● HC-SR04 ultrasonic ranging module ● 10K potentiometer ● 20pin male to male / male to female / female to female dupont wire cable x1
- 29. 29 Compatible to all Raspberry Pi models Buy: https://ricelee.com/product/gpio-game- console-starter-kit
- 31. 31 Practice 1: Hello World Goal: Thinking in Hardware/Software
- 32. 32 ● Light Emitting Diode ● Conduction in one direction ● Low power LED http://upload.wikimedia.org/wikipedia/commons/c/c8/5mm_Red_LED.jpg Longer leg: Vcc Shorter leg: GND
- 33. 33 ● Components: voltage source, conductive wire, load ● Close loop: fully connected path for current ● Ohm’s Law: voltage across a conductive component is proportional to the current ● V = I x R Electronic Circuit I I V RV R I https://zh.wikipedia.org/wiki/ 电路
- 34. 34 Raspberry Pi + LED How to connect? Let’s Read the datasheet
- 35. 35 ● VF: Forward Voltage ● IF: Safe Current at typical VF LED Properties https://learn.adafruit.com/all-about-leds/forward-voltage-and-kvl
- 36. 36 ● The safe current for the LED at VF is 20mA ● The typical VF is 1.85V ● Raspberry Pi GPIO output is 3.3V ● Formula : Resistance = Voltage/Current R = V/I R = (3.3-1.85)/0.02=72.5 Ohm ● A resistor at least 72.5 Ohm should be cascaded to protect the LED from burnt out Read the Datasheet
- 37. 37 Identify a Resistor www.digikey.tw/tw/zht/mkt/5-band-resistors.html 4-band: gold or silver at right 5-band: tolerance is a bit far from the others 1K=borwn,black,black,brown (brown) 2K=red,black,black,brown (brown)
- 38. 38 Which Pin to Connect?
- 39. 39 Which Pin to Connect? One to the ground; One to the voltage source
- 40. 40 Circuit LED RPi Long (RED) Pin12 (GPIO18) Short (BLACK) Pin6 (Ground) 1k Ohm resistor
- 41. 41 Circuit LED RPi Long (RED) Pin12 (GPIO18) Short (BLACK) Pin6 (Ground) 1k Ohm resistor
- 44. 44 Easier Connections 1k Ohm resistor LED RPi Long (RED) Pin12 (GPIO18) Short (BLACK) Pin6 (Ground)
- 45. 45 ● Try this Not work? We haven’t write the program
- 47. 47 Control GPIO with Python
- 48. 48 ● Import module ● Define pin numbering ● Setup up a channel ● Input/Output ● Cleanup Basic Flow in Python http://code.google.com/p/raspberry-gpio-python/wiki/BasicUsage
- 49. 49 #!/usr/bin/python3 ● import RPi.GPIO as GPIO # Import module import time GPIO.setmode(GPIO.BOARD) # Define pin numbering LED_PIN = 12 GPIO.setup(LED_PIN, GPIO.OUT) # Setup up a channel print("LED is on") GPIO.output(LED_PIN, GPIO.HIGH) # Input/Output status time.sleep(3) GPIO.cleanup() # Cleanup Example Use the alias afterwards
- 51. 51 Invoke: nano <filename, e.g., led_on.py> Quit: Ctrl + X > Save As: y > Discard without Saving: n > Exit: Ctrl + C Nano Editor How-To
- 52. 52 $ cd ~ $ git clone https://github.com/raspberrypi-tw/gpio-game-console $ cd ~/gpio-game-console $ cd 01-led_on $ python3 led_on.py Accessing GPIO implies accessing /dev/mem, root privilege is required (The images after 2015-09-24 allow unprivileged access) Execution
- 54. 54 Practice 2: Blinking LED Goal: Getting Familiar with Python
- 55. 55 Same Wiring 1k 電阻 LED RPi Long (RED) Pin12 (GPIO18) Short (BLACK) Pin6 (Ground)
- 56. 56 GPIO.setmode(GPIO.BOARD) LED_PIN = 12 GPIO.setup(LED_PIN, GPIO.OUT) while True: print("LED is on") GPIO.output(LED_PIN, GPIO.HIGH) time.sleep(1) print("LED is off") GPIO.output(LED_PIN, GPIO.LOW) time.sleep(1) GPIO.cleanup() Infinite While Loop - Press Ctrl+C to Break
- 57. 57 DEMO led_blink_warning.py $ cd ~/gpio-game-console $ cd 02_1-led_blink_warning $ python3 led_blink_warning.py
- 58. 58 RuntimeWarning: This channel is already in use, continuing anyway. Use GPIO.setwarnings(False) to disable warnings.
- 59. 59 Why the Warning Message?
- 60. 60 ● Normal exit when finishing the flow ● Abort when error ● Interrupted (Receiving interrupt signal, e.g., Ctrl+C) When is a program terminated?
- 61. 61 try: while True: print("LED is on") GPIO.output(LED_PIN, GPIO.HIGH) time.sleep(1) print("LED is off") GPIO.output(LED_PIN, GPIO.LOW) time.sleep(1) except KeyboardInterrupt: print("Exception: KeyboardInterrupt") finally: GPIO.cleanup() Exception Handling
- 62. 62 DEMO led_blink.py $ cd ~/gpio-game-console $ cd 02_2-led_blink $ python3 led_blink.py
- 63. 63 Practice 3: LED Traffic Lights Goal: Structural Program Design
- 64. 64 ● Red, yellow, and green light in order ● 4-sec red, 2-sec yellow, 4-sec green Traffic Lights http://www.clipartbest.com/traffic-light-photo
- 65. 65 Wiring
- 66. 66 DEMO traffic_light_nonstructure.py $ cd ~/gpio-game-console $ cd 03_1-traffic_light_nonstructure $ python3 traffic_light_nonstructure.py
- 67. 67 def TrafficLight(pin, duration): GPIO.output(pin, GPIO.HIGH) time.sleep(duration) GPIO.output(pin, GPIO.LOW) try : while True: TrafficLight(RED_PIN, 4); TrafficLight(YEL_PIN, 2); TrafficLight(GRN_PIN, 4); finally: GPIO.cleanup() Function for Light
- 68. 68 DEMO traffic_light.py $ cd ~/gpio-game-console $ cd 03_2-traffic_light $ python3 traffic_light.py
- 69. 69 Digital Input
- 70. 70 Practice 4: Button Input Goal: Distinguish Hardware and Software Signals
- 71. 71 ● Push button, sliding switch, tilt switch... Button / Switch http://nicegear.co.nz/
- 72. 72 ● normally open, N.O. ● normally close, N.C. Button / Switch http://www.engineersgarage.com/sites/default/files/imagecache/Original/wysiwyg_imageupload/4214/Switch-2_0.jpg
- 73. 73 Internal Structure http://www.ladyada.net/learn/arduino/lesson5.html ● Before push ● Connected: 1&2, 3&4 ● After push ● Connected: 1&2&3&4 1 2 3 4
- 74. 74 Simple Wiring BUTTON RPi Leg 1 Pin6 (Ground) Leg 3 Pin11 (GPIO17)
- 75. 75 ● Floating Input Undetermined→ Problem Not push → voltage?Push → low voltage
- 76. 76 Better One (Pull-up Resistor) http://geekgurldiaries.blogspot.tw/2012/12/part-2.html
- 77. 77 Wiring BUTTON RPi Leg 1 Pin6 (Ground) Leg 3 Pin11 (GPIO17) Pin1 (3.3V) 1k Ohm
- 78. 78 BTN_PIN = 11 GPIO.setup(BTN_PIN, GPIO.IN) previousStatus = None try: while True: input = GPIO.input(BTN_PIN) if input == GPIO.LOW and previousStatus == GPIO.HIGH: print("Button pressed") previousStatus = input except KeyboardInterrupt: print("Exception: KeyboardInterrupt") finally: GPIO.cleanup() Criteria: Current Low && Previous High
- 79. 79 DEMO push_button_poll.py $ cd ~/gpio-game-console $ cd 04_1-push_button_poll $ python3 push_button_poll.py
- 80. 80 Multiple Detections of a Single Button Press
- 81. 81 ● Moving parts of a mechanical switch would bounce and generate noise Issue of Bounce http://120.101.72.1/Onechip/PPT/ 實習單元三 .ppt Ideal Signal Practical Signal
- 82. 82 ● Hardware: RC circuit or Positive Feedback Comparator ● Software: Adjust the detection delay ● Button dependent De-bounce 10ms - 20ms
- 83. 83 GPIO.setup(BTN_PIN, GPIO.IN) previousStatus = None previousTime = time.time() currentTime = None try: while True: input = GPIO.input(BTN_PIN) currentTime = time.time() if input == GPIO.LOW and previousStatus == GPIO.HIGH and (currentTime - previousTime) > 0.2: previousTime = currentTime print("Button pressed”) previousStatus = input Additional Criterion: Detection Delay
- 84. 84 DEMO push_button_debounce.py $ cd ~/gpio-game-console $ cd 04_2-push_button_debounce $ python3 push_button_debounce.py
- 85. 85 View System Usage PID ● Execute a program in background ● $ python3 push_button_debounce.py &
- 86. 86 ● Execute a program in background ● $ python3 push_button_debounce.py & ● View the system usage ● $ top -c View System Usage PID
- 87. 87 ● Polling ● The SoC checks the peripherals periodically ● Interrupt ● When a peripheral change its state, it sends an interrupt request to the SoC Polling vs. Interrupt
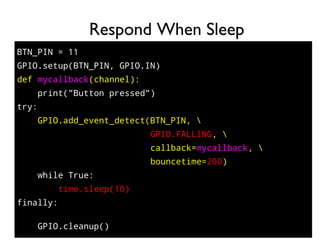
- 88. 88 ● Define the callback function ● def mycallback() ● Bind the event to the callback ● add_event_detect(gpio, # target edge, # trigger callback,# callback bouncetime) ● Multiple events can be bounded to the same callback Programming with Interrupt source/py_gpio.c
- 89. 89 BTN_PIN = 11 GPIO.setup(BTN_PIN, GPIO.IN) def mycallback(channel): print("Button pressed") try: GPIO.add_event_detect(BTN_PIN, GPIO.FALLING, callback=mycallback, bouncetime=200) while True: time.sleep(10) finally: GPIO.cleanup() Respond When Sleep
- 90. 90 DEMO push_button_interrupt.py $ cd ~/gpio-game-console $ cd 04_3-push_button_interrupt $ python3 push_button_interrupt.py
- 91. 91 ● Require Hardware or Software (O.S.) Support ● RPi.GPIO supports interrupt after version 0.5.0a ● add_event_detect() ● RPi.GPIO use multi-threading to implement ● Main thread starts with the program ● After adding and event, use epoll_create to allocate a new fd ● When the event is triggered, the 2nd thread invokes the callback and communicate with the main thread ● Source code: source/event_gpio.c Interrupt source/py_gpio.c
- 92. 92 Simple Wiring Works, If…. BUTTON RPi Leg 1 Pin6 (Ground) Leg 3 Pin11 (GPIO17)
- 93. 93 GPIO.setup(BTN_PIN, GPIO.IN, pull_up_down=GPIO.PUD_UP) def mycallback(channel): print("Button pressed") try: GPIO.add_event_detect(BTN_PIN, GPIO.FALLING, callback=mycallback, bouncetime=WAIT_TIME) while True: time.sleep(10) finally: GPIO.cleanup() Using Built-in Pull-up Resistor (50k)
- 94. 94 DEMO push_button_internal_pull_up.py $ cd ~/gpio-game-console $ cd 04_4-push_button_internal_pull_up $ python3 push_button_internal_pull_up.py
- 95. 95 Practice 5: Tilt Switch Goal: Variants of Hardware
- 96. 96 Tilt Switch
- 97. 97 Wiring SWITCH RPi Leg 1 (RED) Pin11 (GPIO17) Leg 2 (BLACK) Pin6 (Ground)
- 98. 98 GPIO.setup(BTN_PIN, GPIO.IN, pull_up_down=GPIO.PUD_UP) def mycallback(channel): print("Button pressed") try: GPIO.add_event_detect(BTN_PIN, GPIO.FALLING, callback=mycallback, bouncetime=WAIT_TIME) while True: time.sleep(10) finally: GPIO.cleanup() Don’t Forget Pull-up Resistor (50k)
- 99. 99 DEMO tilt_switch.py $ cd ~/gpio-game-console $ cd 05-tilt_switch $ python3 tilt_switch.py Using Built-in Pull-up Resistor
- 101. 101 ● Sound: Caused by vibration (audio frequency) ● Buzzer: Current (6) flows through Coil (3) and generates electromagnetic field to vibrate the membrane (11) ● Human audible frequency: 20Hz - 20KHz Theory http://www.hs-buzzer.com/technology/Magnetic%20Buzzer
- 102. 102 ● Self drive: internal, designated frequency ● Plastic package, log/short legs ● External drive: pulse oscillate wave ● Green PCB, same-length legs ● +/- denoted on the PCB Buzzer http://www.buzzer-speaker.com/manufacturer/piezo%20buzzer.htm Self drive External drive
- 103. 103 Wiring BUZZER RPi +(RED) Pin12 (GPIO18) - (BLACK) Pin6 (Ground)
- 104. 104 def buzz(pitch, duration) : period = 1.0 / pitch half_period = period / 2 cycles = int(duration * pitch) for i in range(cycles) : GPIO.output(buzzer_pin, GPIO.HIGH) time.sleep(half_period) GPIO.output(buzzer_pin, GPIO.LOW) time.sleep(half_period) while True : pitch_s = input("Enter Pitch (200 to 2000): ") duration_s = input("Enter Duration (seconde): ") buzz(float(pitch_s), float(duration_s)) Buzz at Different Frequencies
- 105. 105 DEMO buzzer.py $ cd ~/gpio-game-console $ cd 06_1-buzzer $ python3 buzzer.py
- 106. 106 ● ● 88 key standard piano the frequency of the nth key is ● Every octave is made of 12 steps ● Each successive pitch is multiplied by 1.05946 ( ) Piano 1 2 3 4 5 6 7 0 8 http://en.wikipedia.org/wiki/Piano_key_frequencies 12 √2
- 107. 107 ● 88 key standard piano, the 49th key (A4) is tuned to 440Hz ● frequencies : ● C5 (52th, DO): 523Hz ● D5 (54th, RE): 587Hz ● E5 (56th, ME): 659Hz ● F5 (57th, FA): 698Hz ● G5 (59th, SO): 784Hz ● A5 (61th, LA): 880Hz ● B5 (63th, SI): 988Hz Piano Key Frequencies http://en.wikipedia.org/wiki/Piano_key_frequencies
- 108. 108 Wiring RPi Pin7 Buzzer Pin11 Do Pin12 Re Pin13 Me Pin15 Fa Pin16 So Pin18 La Pin22 Si
- 109. 109 DEMO paino_buzzer.py $ cd ~/gpio-game-console $ cd 06_2-paino_buzzer $ python3 paino_buzzer.py
- 110. 110 Practice 7: Passive Infrared Sensor (PIR) Goal: Typical Sensor Usage
- 111. 111 Pyroelectric ("Passive") InfraRed Sensor http://www.raspberrypi-spy.co.uk/2013/01/cheap-pir-sensors-and-the-raspberry-pi-part-1/
- 115. 115 ● Input: DC 3.3V - 24V ● Output: 3.3V (Compatible to RPi) ● Delay time (Tx): 2.45sec – 248sec ● Stay HIGH after IR detected ● Block time (Ti): 2.4sec ● Disable interval between detections ● Sensitivity (angle): 110° x 70° ● Sensitivity (distance): 3m - 7m Datasheet
- 116. 116 ● Adjust sensitivity ● Clockwise: up to 7m ● Counter clockwise: down to 3m ● Adjust delay time (Tx) ● Clockwise: up to 248sec ● Counter clockwise: down to 2.45sec ● Delay time is bounded by R10,C6,R9,C7 Sensitivity / Delay Sensitivity adjustment Delay time adjustment
- 117. 117 ● Repeat Trigger (H) ● Single Trigger (L) Trigger Mode H: repeat trigger L: single trigger (default) Detect & Output Detect & Wait & Output
- 118. 118 Wiring Pin26
- 119. 119 PIR_PIN = 26 GPIO.setup(PIR_PIN, GPIO.IN, pull_up_down=GPIO.PUD_DOWN) def mycallback(channel): print("Motion detected") try: GPIO.add_event_detect(PIR_PIN, GPIO.RISING, callback=mycallback, bouncetime=200) while True: time.sleep(1) finally: GPIO.cleanup() Use Interrupt
- 120. 120 DEMO pir.py $ cd ~/gpio-game-console $ cd 07_1-pir $ python3 pir.py HIGH for Detected, Use Built-in Pull-down Resistor
- 121. 121 Attach an LED Indicator
- 123. 123 DEMO people_alarm_system.py $ cd ~/gpio-game-console $ cd 07_2-people_alarm_system $ python3 people_alarm_system.py
- 124. 124 LED_PIN = 12 PIR_PIN = 26 GPIO.setup(PIR_PIN, GPIO.IN, pull_up_down=GPIO.PUD_DOWN) GPIO.setup(LED_PIN, GPIO.OUT) def mycallback(channel): print("Motion detected") for i in range(3) : GPIO.output(LED_PIN, GPIO.HIGH) time.sleep(0.5) GPIO.output(LED_PIN, GPIO.LOW) time.sleep(0.5) try: GPIO.add_event_detect(PIR_PIN, GPIO.RISING, callback=mycallback, bouncetime=200) while True: time.sleep(1) Detected, Flashing 3 Times
- 125. 125 Practice 8: Ultrasonic Ranging Module Goal: Programming with Datasheet
- 126. 126 ● Speed of Sound is 343m/s at 20°C (68°F) ● Speed increases 0.6m/s when increasing 1°C Theory http://en.wikipedia.org/wiki/Speed_of_sound https://www.modmypi.com/blog/hc-sr04-ultrasonic-range-sensor-on-the-raspberry-pi
- 127. 127 ● Built-in transmitter and receiver (40kHz) ● Calculate distance based on the interval between the transmitted pulse and the received pulse ● Special: US-020 (long range), US-100(temperature compensation) HC-SR04 Ultrasonic Ranging Module http://coopermaa2nd.blogspot.tw/2012/09/hc-sr04.html
- 128. 128 ● Avoidance, ranging ● Movement detection ● Train detector Applications http://letsmakerobots.com/robot/project/rock-crawler https://www.dropbox.com/s/x0qdaq86rkc0zyv/MakerConf.pdf
- 131. 131 ● Spec & Timing HC-SR04 http://coopermaa2nd.blogspot.tw/2012/09/hc-sr04.html Suggested trigger interval>60ms
- 132. 132 ● TRIG HIGH (3.3V) Send ultrasound→ ● ECHO keeps LOW (0V) until receiving response HIGH (5V)→ ● Raspberry Pi voltage tolerance is 3.3V → need to reduce ECHO 5V to 3.3V Voltage Dividing Circuit https://www.modmypi.com/blog/hc-sr04-ultrasonic-range-sensor-on-the-raspberry-pi => R1=1K, design R2 to 2K
- 133. 133 Note the 1K, 2K Resistors VccGnd Echo Trig Back Side ULTRASONIC RPi Vcc(RED) Pin2 (5V) Trig(YELLOW) Pin16 (GPIO23) Echo(PURPLE) Pin18 (GPIO24) Grnd(BLACK) Pin6 (Ground) 1k Ohm 2k Ohm
- 134. 134 v = 343 # (331 + 0.6*20) def measure() : GPIO.output(TRIGGER_PIN, GPIO.HIGH) time.sleep(0.00001) # 10uS GPIO.output(TRIGGER_PIN, GPIO.LOW) pulse_start = None pulse_end = None while GPIO.input(ECHO_PIN) == GPIO.LOW: pulse_start = time.time() while GPIO.input(ECHO_PIN) == GPIO.HIGH: pulse_end = time.time() t = pulse_end - pulse_start d = t * v d = d/2 return d*100 Measure the Distance
- 135. 135 DEMO hc_sr04_measure_distance.py $ cd ~/gpio-game-console $ cd 08-hc_sr04_measure_distance $ python3 hc_sr04_measure_distance.py
- 137. 137 Practice 9: Breathing Light Goal: Simulate Signals
- 138. 138 ● Digital: signal representing 0 and 1 ● Analog: continuous signal Digital & Analog http://www.bitscope.com/software/blog/DJ/?p=DJ19A
- 139. 139 ● Digital: Light ON/OFF ● Analog: bright, a little bright, a little dim, dim... ● However, GPIO output is is either HIGH or LOW Signal Represented by LED
- 140. 140 ● Thumb pot, Slide pot ● Linear taper (Type B), Logarithmic (Type A) ● Spec: 0 -10k Ohm (Linear) Potentiometer (VR) https://en.wikipedia.org/wiki/Potentiometer Fixed End (voltage 2) Fixed End (voltage 1) Variable End (OUT)
- 143. 143 ● Emulating analog signal by pulses ● Fixed frequency + Variable duty cycle ● duty cycle affects average voltage Pulse-Width Modulation (PWM) http://wiki.csie.ncku.edu.tw/embedded/PWM
- 144. 144 ● power ∝ pulse width (time) x Voltage Formula http://www.protostack.com/blog/2011/06/atmega168a-pulse-width-modulation-pwm/
- 145. 145 ● To create a PWM instance: ● p = GPIO.PWM(channel, frequency) ● To start PWM: ● p.start(dc) # dc is the duty cycle ● To change the duty cycle: ● p.ChangeDutyCycle(dc) # where 0.0 <= dc <= 100.0 ● To stop PWM: ● p.stop() GPIO.PWM() http://sourceforge.net/p/raspberry-gpio-python/wiki/PWM/
- 146. 146 Wiring LED RPi Long (RED) Pin12 (GPIO18) Short (BLACK) Pin6 (Ground) 1k Ohm
- 147. 147 LED_PIN = 12 ● GPIO.setup(LED_PIN, GPIO.OUT) pwm_led = GPIO.PWM(LED_PIN, 100) ● pwm_led.start(0) ● ● try: ● while True: ● duty_s = input("Enter Brightness (0 to 100):") ● duty = int(duty_s) ● ● if duty >= 0 and duty <=100 : ● pwm_led.ChangeDutyCycle(duty) ● ● except KeyboardInterrupt: ● pwm_led.stop() ● GPIO.cleanup() Interactive Adjustment
- 148. 148 DEMO adjust_led_bright.py $ cd ~/gpio-game-console $ cd 09_1-adjust_led_bright $ python3 adjust_led_bright.py
- 149. 149 LED_PIN = 12 GPIO.setup(LED_PIN, GPIO.OUT) pwm_led = GPIO.PWM(LED_PIN, 100) pwm_led.start(0) while True: for dc in range(0, 101, 5): pwm_led.ChangeDutyCycle(dc) time.sleep(0.1) time.sleep(0.5) for dc in range(100, -1, -5): pwm_led.ChangeDutyCycle(dc) time.sleep(0.1) time.sleep(0.5) Slow-pace Bright and Dim
- 150. 150 DEMO pwm_led.py $ cd ~/gpio-game-console $ cd 09_2-pwm_led $ python3 pwm_led.py
- 151. 151 ● Differences ● Software PWM: controlled by kernel ● Hardware PWM: controlled by SoC via DMA ● When to use ● Software PWM: imprecise, e.g., LED brightness ● Hardware PWM: realtime control, e.g., servo motor ● Hardware PWM GPIO on Pin 12 and Pin 33 (Model B+ or later) ● pigpiod provides Hardware PWM functions Software PWM vs. Hardware PWM
- 153. 153 ● Cadmium sulfide (CdS) or light dependent resistor (LDR), the resistance varies with the amount of light ● Brighter Lower resistance→ ● Applications: switch, toy, control Photoresistor http://www2.nkfust.edu.tw/~jlkuo2/31/a6.htm
- 154. 154 ● Raspberry Pi has no analog to digital converter (ADC) Analog to Digital Conversion http://www.planetoftunes.com/digital-audio/how-do-analogue-to-digital-converters-work.html IN ADC OUT The ADC has 4-bit resolution From 0000 to 1111 (Y-axis)
- 155. 155 ● Analog to Digital Converter ● 8 channels, 10-bit resolution ● SPI protocol MCP3008
- 156. 156 ● One-to-many master-slave ● 4-wire synchronous serial communication ● SS: Slave-Select (CE) ● SCK: Serial Clock (SCLK) ● MOSI: Master Out Slave In ● MISO: Master In Slave Out Serial Peripheral Interface (SPI) https://en.wikipedia.org/wiki/Serial_Peripheral_Interface_Bus SPI Master SCLK MOSI MISO SS1 SS2 SS3 SPI Slave SCLK MOSI MISO SS SPI Slave SCLK MOSI MISO SS SPI Slave SCLK MOSI MISO SS
- 157. 157 ● $ sudo raspi-config Enable SPI
- 158. 158 ● $ sudo raspi-config Enable SPI
- 159. 159 ● $ sudo raspi-config Enable SPI
- 160. 160 ● Ensure the SPI module is loaded ● $ ls /dev/spi* ● Required packages (if not installed) ● $ sudo apt-get update ● $ sudo apt-get install -y python-dev ● $ sudo pip install spidev Before Continuing
- 161. 161 Wiring MCP3008 RPi CLK Pin23 (SCLK) Din Pin19 (MOSI) Dout Pin21 (MISO) CS Pin24 (CE0) Half-moon polarity mark on the left side 1k Ohm
- 162. 162 ● SPI MOSI, MISO, SCLK and CE0/CE1 Determine the Pins
- 163. 163 spi = spidev.SpiDev() spi.open(0,0) # (0,0) indicates CE0 and /dev/spidev0.0 spi.max_speed_hz = 1800000 # 10kHz to 3.6 MHz ● ● def ReadChannel(channel): adc = spi.xfer2([1,(8+channel)<<4,0]) data = ((adc[1]&3) << 8) + adc[2] return data def ConvertVolts(data,places): volts = (data * 3.3) / float(1023) volts = round(volts,places) return volts light_channel = 0 delay = 1 while True: light_level = ReadChannel(light_channel) light_volts = ConvertVolts(light_level, 2) print("Light:{} ({}V)".format(light_level,light_volts)) time.sleep(delay)
- 164. 164 Write Program with Datasheet
- 165. 165 ● Input consists of 3 bytes ● # byte 1: the start bit (always 0x01) ● # byte 2: configure bits ● # byte 3: don't care ● spi.xfer2([1,(8+channel)<<4,0]) ● Ch0 = 1000 0000 ● Ch1 = 1001 0000 Understand spi.xfer2() 0x01 don't careCh0/Ch1
- 167. 167 http://wolfpaulus.com/ Output also consists of 3 bytes Due to 10-bit resolution, only the least significant 10 bits are used
- 168. 168 DEMO photoresistor.py $ cd ~/gpio-game-console $ cd 10-photoresistor $ python3 photoresistor.py
- 171. 171 Game Console = Hardware + Game http://www.emulatorworld.com/
- 172. 172 ● Emulate hardware architecture ● Popular emulators : ● MAME (AdvanceMAME) ● Nintendo Entertainment System (RetroArch) ● Super Nintendo Entertainment System (PiSNES) ● PC / x86 (rpix86) Video Game System Emulators https://en.wikipedia.org/wiki/List_of_video_game_emulators
- 173. 173 ● Emulate Arcade Machines MAME(Multiple Arcade Machine Emulator) http://www.williamsamusements.co.uk/mame.html
- 174. 174 ● RFB protocol + screen sharing and remote control ● O.S. independent, cross-platform ● Client/Server architecture Virtual Network Computing
- 175. 175 ● Desktop Mirroring (x11vnc) ● Mirror an existent X11 display ● Virtual Desktop (xvnc) ● A separate X server VNC Implementations
- 177. 177 ● $ x11vnc ● Configuration Options ● Do not terminate x11vnc – $ x11vnc -forever ● Specify the geometry – $ x11vnc -geometry WidthxHeight Use x11vnc Server on Pi Lowercase x
- 178. 178
- 179. 179
- 180. 180 ● Download realvnc viewer https://www.realvnc.com/en/connect/download/viewer x11vnc Client Installation Same as x11vnc port
- 181. 181
- 182. 182 ● Download pre-built binary (Downloaded) ● $ cd ~ ● $ wget http://bit.ly/2OnUMwh -O ~/advmame ● $ chmod 755 advmame ● $ ./advmame ● 2. Download ROM (Downloaded) ● $ cd ~ ● $ wget http://bit.ly/2K1dhUb -O ~/.advance/rom/suprmrio.zip ● 3. Execute emulator (Not yet) ● $ cd ~ ● $ ./advmame suprmrio AdvanceMAME in x11vnc Uppercase “O”
- 183. 183 ● Search at MAME ● http://www.emuparadise.me/ ● In both Chinese and English ● http://bbs.duowan.com/thread-41350071-1-1.html ● Popular Classic Games ● Super Mario Bros ● Pinball ● Pacman ● Battle City, Bubble Bobble... Download the ROM http://en.wikipedia.org/wiki/Nintendo_Entertainment_System
- 184. 184 ● $ cd ~ ● $ ./advmame suprmrio ● Enter Game: Key 'o' 'k' ● Insert Coin: Key '5' ● Start: Key '1' ● Accelerate: Left 'Ctrl' ● Jump: Left 'Alt' ● Exit: 'ESC' Use Emulator
- 185. 185 ● Execute emulator, control by keyboard ● Read GPIO joystick input ● Map joystick input to key press ● Start key press mapper on system boot ● Start emulator on system boot Making the Game Console http://www.linuxuser.co.uk/tutorials/emulate-a-bluetooth-keyboard-with-the-raspberry-pi
- 186. 186 Joysticks
- 187. 187 ● 3.3V-5V operation voltage ● Output : ● x,y-axis - analog ● z-axis - digital XY-axis Joystick http://www.aliexpress.com/cheap/cheap-arduino-joystick.html
- 189. 189 spi = spidev.SpiDev() ● spi.open(0,0) ● spi.max_speed_hz = 1800000 ● ● def ReadChannel(channel): ● adc = spi.xfer2([1,(8+channel)<<4,0]) ● data = ((adc[1]&3) << 8) + adc[2] ● return data ● ● vrx_channel = 1 ● vry_channel = 2 ● ● while True: ● vrx_pos = ReadChannel(vrx_channel) ● vry_pos = ReadChannel(vry_channel) ● ● print("X : {} Y : {} ".format(vrx_pos,vry_pos)) ● ● time.sleep(0.5)
- 190. 190 DEMO mcp3008_joystick $ cd ~/gpio-game-console $ cd 11_1-mcp3008_joystick $ python3 mcp3008_joystick.py
- 192. 192 How to map joystick input to key- press?
- 195. 195 ● USB/PS2 keyboards share the same handler ● Is it possible to have a GPIO driver that is associated with the keyboard handler? Linux Input Subsystem http://www.linuxjournal.com/article/6396 USB Keyboard PS2 Keyboard
- 196. 196 Is it possible to accomplish it in the user space instead of the kernel space?
- 197. 197 ● evdev(event device) ● Generic input event interface in linux kernel, a driver generates an input event and publish it on /dev/input/ device node ● python-evdev ● uinput is the userspace input subsystem. This package also provides bindings to uinput, allowing to inject events in the python programs ● Installation ● $ sudo pip install evdev python-evdev https://pypi.python.org/pypi/evdev
- 198. 198 python-evdev keyboard example from evdev import UInput, ecodes as e ui = UInput() ui.write(e.EV_KEY, e.KEY_H, 1) # KEY_H down ui.write(e.EV_KEY, e.KEY_H, 0) # KEY_H up ui.write(e.EV_KEY, e.KEY_E, 1) ui.write(e.EV_KEY, e.KEY_E, 0) ui.write(e.EV_KEY, e.KEY_L, 1) ui.write(e.EV_KEY, e.KEY_L, 0) ui.write(e.EV_KEY, e.KEY_L, 1) ui.write(e.EV_KEY, e.KEY_L, 0) ui.write(e.EV_KEY, e.KEY_O, 1) ui.write(e.EV_KEY, e.KEY_O, 0) ui.syn() ● ui.close()
- 199. 199 DEMO evdev_keyboard.py $ cd ~/gpio-game-console $ cd 11_2-evdev_keyboard $ sudo python3 evdev_keyboard.py Require root privilege to send keyboard events
- 201. 201 Use x11vnc
- 202. 202 Arrow Keys and Joystick Input
- 203. 203 Arrow Keys and Joystick Input - Examine the read value for various joystick movement
- 204. 204 vrx_channel = 1 while True: vrx_pos = ReadChannel(vrx_channel) if vrx_pos > 700 : ui.write(e.EV_KEY, e.KEY_DOWN, 1) ui.write(e.EV_KEY, e.KEY_UP, 0) ui.syn() elif vrx_pos < 200 : ui.write(e.EV_KEY, e.KEY_DOWN, 0) ui.write(e.EV_KEY, e.KEY_UP, 1) ui.syn() else : ui.write(e.EV_KEY, e.KEY_DOWN, 0) ui.write(e.EV_KEY, e.KEY_UP, 0) ui.syn() time.sleep(0.1)
- 205. 205 DEMO joystick_mapping_keyboard.py $ cd ~/gpio-game-console $ cd 11_3-joystick_mapping_keyboard $ sudo python3 joystick_mapping_keyboard.py
- 206. 206 Joystick + Buttons MakerFaire 2014 Raspberry Jam
- 208. 208 DEMO gaming_console.py $ cd ~/gpio-game-console $ cd 13-gaming_console $ sudo python3 gaming_console.py
- 209. 209 ● One for executing Super Mario Bros (x11vnc) ● $ cd ~ ● $ ./advmame suprmrio Super Mario Bros with Joystick - Open two windows Start the game within x11vnc
- 210. 210 ● The other for joystick mapper (serial OR ssh) ● $ cd ~/gpio-game-console/13-gaming_console ● $ sudo python3 gaming_console.py Super Mario Bros with Joystick Execute mapper from the terminal session (via serial OR ssh)
- 211. 211 Complicated! How to start at boot?
- 212. 212 ● One-shot execution: put the command in /etc/rc.local ● Background service: write systemd unit file ● GUI programs: use LXDE autostart Start at Boot
- 213. 213 ● Add a line (highlighted yellow) ● $ sudo nano /etc/rc.local sudo python /home/pi/gpio-game-console/13- gaming_console/gaming_console.py & # Print the IP address _IP=$(hostname -I) || true if [ "$_IP" ]; then printf "My IP address is %sn" "$_IP" fi exit 0 Key-press Mapper at Boot Note: a single line
- 214. 214 ● $ nano ~/.config/lxsession/LXDE-pi/autostart OR ● $ sudo nano /etc/xdg/lxsession/LXDE-pi/autostart ● Add a line (highlighted yellow) @lxpanel --profile LXDE-pi @pcmanfm --desktop --profile LXDE-pi @xscreensaver -no-splash @lxterminal -e /home/pi/advmame suprmrio ● Reboot & Check Super Mario Bros on Starting Desktop Environment
- 215. 215 Application of Ultrasonic Ranging Module ● Gesture launcher of the pinball game: 1. fist & move toward to trigger 2. move fist back 15cm 3. palm = release the launcher
- 216. 216 Game Console - Outer Casing Matters demo board large gameboy (front) large gameboy (internal) small gameboy (front) small gameboy (internal) arcade game machine
- 219. 219 Raspberry Pi Rocks the World Thanks
- 221. 221 ● Install gcc-4.8 ● $ sudo apt-get install gcc-4.8 ● Download advancemame-1.4.tar.gz ● http://www.advancemame.it/download ● Build & Install ● $ sudo apt-get install -y gcc-4.8 libsdl1.2-dev ● $ tar zxvf advancemame-1.4.tar.gz ● $ cd advancemame-1.4/ ● $ CC=gcc-4.8 GCC=g++-4.8 ./configure --disable- fb ● $ make -j4 ● $ ./advmame AdvanceMAME
- 222. 222 ● 1.Generate rc file ● $ cd /home/pi/advancemame-1.4 ● $ chmod 755 advmame ● $ ./advmame ● 2.Download rom ● $ cd /home/pi/.advance/rom ● 3.Execute the emulator ● $ cd /home/pi/advancemame-1.4 ● $ ./advmame suprmrio Executing the Emulator
- 224. 224 ● Set display resolution to 256x240x60 ● TAB-key to activate the menu, choose [Video Mode], ESC-key to leave My AdvanceMAME is Slooow
- 225. 225 ● Set display resolution to 256x240x60 ● TAB-key to activate the menu, choose [Video Mode], ESC-key to leave My AdvanceMAME is Slooow
- 226. 226 ● Set display resolution to 256x240x60 ● TAB-key to activate the menu, choose [Video Mode], ESC-key to leave My AdvanceMAME is Slooow