Embedded system course projects - Arduino Course
0 likes274 views

The document outlines an Arduino course that covers various projects involving components like sensors, motors, and displays. Key topics include using the Arduino IDE for programming with sketches, controlling outputs through PWM, and interfacing with various modules like Bluetooth and ultrasonic sensors. It provides detailed instructions and circuit designs for hands-on projects such as using LEDs, push buttons, and LCDs with the Arduino Uno.


![PULSE WIDTH MODULATION (PWM)
Pulse Width Modulation or PWM is a technique for supplying electrical power to a
load that has a relatively slow response. The supply signal consists of a train of
voltages pulses such that the width of individual pulses controls the elective voltage
level to the load. Both AC and DC signals can be simulated with PWM. In these notes
we will describe the use of PWM on an Arduino for controlling LEDs and DC motors.
An Arduino Uno has 14 digital I/O pin(s) 6 provide PWM output. The PWM give an
analog output signal in rage[0,255] where each 255samples means 5V digital so, to
determine the required analog output voltage use the relation:](https://image.slidesharecdn.com/embeddedsystemcourseprojectsslideshare-210211164916/85/Embedded-system-course-projects-Arduino-Course-36-320.jpg)


![P12-ARDUINO WITH BLUETOOTH
AT Command Mode:
AT mode refers to the form of communication to the HC-05 Bluetooth Module.
AT Commands are short for ATtention Commandswhich is a command
languageused for modems known as theHayes command set. Hayes command
setis a specific command language originally developed by Dennis Hayes for
the Hayes Smartmodem 300 baud modem in 1981 [2].The HC-05 Bluetooth
Module was used due to its ability to be configuredas Master or Slave mode as
well as adding a password to the module.](https://image.slidesharecdn.com/embeddedsystemcourseprojectsslideshare-210211164916/85/Embedded-system-course-projects-Arduino-Course-94-320.jpg)


Embedded system course projects - Arduino Course
- 1. ARDUINO COURSE ARDUINO IDE & SIMPLE PROJECTS Eng. Elaf A.Saeed
- 2. WHAT WE LEARN • P8-Arduino with LM35. • P9-Arduino with gas sensor. • P10-Arduino with dc motor. • P11-Arduino with Servo Motor. • P12-Arduino with Bluetooth. • P13-Arduino with ultrasonic. • P14-Arduino with IR sensor. • Arduino IDE. • P1-Arduino with led. • P2-Arduino with push button. • P3-Arduino with potentiometer. • P4-Arduino with PWM. • P5-Arduino with LCD. • P6-Arduino with PIR. • P7-Arduino with DHT11
- 3. ARDUINO IDE
- 4. STRUCTURE OF THE PROGRAM Each Arduino program (often called a sketch) has two required functions: 1-void setup (){ } All the code between the two curly brackets will be run once when your Arduino program first runs. 2-void loop (){ } This function is running after setup has finished. After it has run once it will be run again, and again, until power is removed.
- 5. VARIABLES 1-int (integer): The main workhorse, stores a number in 2 bytes (16 bits). 2-float (float): Used for floating point math (decimals). Takes 4 bytes (32bits). 3-char (character): Stores one character using the ASCII code, (i.e 'A' = 65). Uses one byte (8 bits)
- 7. DIGITAL PORTS 1-pinMode (pin, mode): Used to set a pins mode, pin is the pin number and the mode can either be INPUT or OUTPUT. 2- digitalWrite(pin, value): Once a pin is set as an OUTPUT, it can be set either HIGH (pulled to +5 volts) or LOW (pulled to ground). 3- int digitalRead(pin); Once a pin is set as an INPUT you can use this to return whether it is HIGH (pulled to+5 volts) or LOW (pulled to ground).
- 8. ANALOG PORTS 1-int analogWrite(pin,value): Some of the Arduino's pins support pulse width modulation (3, 5, 6, 9,10 and 11). This turns the pin on and off very quickly making it act like an analog output (Pulse Width Modulation PWM technique). The value is any number between 0 bit (0% duty cycle ~0v) and 255 bits (100% duty cycle ~5 volts). 2-int analogRead(pin): When the analog input pins are set to input you can read their voltage. A value between 0bit (for 0volts) and 1024 bit (for 5volts) will be returned.
- 9. CONTROL STRUCTURE if(condition){ } else if( condition ){ } else { } This will execute the code between the curly brackets if the condition is true, and if not it will test the else if condition if that is also false the else code will execute.
- 10. LED SCHEMATIC
- 11. LED CONNECTION WITH ARDUINO
- 12. LED CONNECTION WITH ARDUINO
- 13. P1-ARDUINO WITH LED Apparatus: 1-Breadboard. 2-Arduino UNO. 5-jumper wires. 6-LED. 7-Resistance 330 ohm.
- 14. P1-ARDUINO WITH LED (CONT.) Circuit Design:
- 15. P1-ARDUINO WITH LED (CONT.) Code:
- 16. P2-ARDUINO WITH PUSH BUTTON
- 17. PUSH BUTTON
- 18. PUSH BUTTON CONNECTION WITH RESISTOR
- 20. PUSH BUTTON CONNECTION WITH PULL-UP RESISTOR
- 21. P2-ARDUINO WITH PUSH BUTTON Apparatus: 1-Breadboard. 2-Arduino UNO. 5-jumper wires. 6-LED. 7-Resistance 330 ohm x2. 8-push Button.
- 22. P2-ARDUINO WITH PUSH BUTTON(CONT.) Circuit Design:
- 23. P2-ARDUINO WITH PUSH BUTTON(CONT.) Code:
- 24. P2-ARDUINO WITH PUSH BUTTON(CONT.) Circuit Design:
- 25. P2-ARDUINO WITH PUSH BUTTON(CONT.) Code:
- 27. POTENTIOMETER
- 28. ANALOG PORTS INPUT - int analogRead(pin): When the analog input pins are set to input you can read their voltage. A value between 0bit (for 0volts) and 1024 bit (for 5volts) will be returned.
- 29. SERIAL MONITOR
- 30. SERIAL Serial Used for communication between the Arduino board and a computer or other devices. All Arduino boards have at least one serial port (also known as a UART or USART), and some have several. Serial.begin(speed) Sets the data rate in bits per second (baud) for serial data transmission. Serial.available() Get the number of bytes (characters) available for reading from the serial port. This is data that’s already arrived and stored in the serial receive buffer (which holds 64 bytes).
- 31. SERIAL Serial.read() Reads incoming serial data. Serial.print(val) Prints data to the serial port as human-readable ASCII text. Serial.println() Prints data to the serial port as human-readable ASCII text followed by a carriage return character (ASCII 13, or 'r') and a newline character (ASCII 10, or 'n'). Serial.write(val) Writes binary data to the serial port. This data is sent as a byte or series of bytes; to send the characters representing the digits of a number use the print() function instead.
- 32. P3-ARDUINO WITH POTENTIOMETER Apparatus: 1- Breadboard. 2- Arduino UNO. 3- jumper wires. 4- Potentiometer 5kohm.
- 33. P3-ARDUINO WITH POTENTIOMETER (CONT.) Circuit Design:
- 34. P3-ARDUINO WITH POTENTIOMETER (CONT.) Code:
- 36. PULSE WIDTH MODULATION (PWM) Pulse Width Modulation or PWM is a technique for supplying electrical power to a load that has a relatively slow response. The supply signal consists of a train of voltages pulses such that the width of individual pulses controls the elective voltage level to the load. Both AC and DC signals can be simulated with PWM. In these notes we will describe the use of PWM on an Arduino for controlling LEDs and DC motors. An Arduino Uno has 14 digital I/O pin(s) 6 provide PWM output. The PWM give an analog output signal in rage[0,255] where each 255samples means 5V digital so, to determine the required analog output voltage use the relation:
- 37. PULSE WIDTH MODULATION (PWM) Veff is the required output level such (2, 2.5, 3, 3.5…etc.).
- 38. P4-ARDUINO WITH PWM Apparatus: 1. Breadboard. 2. Arduino UNO. 3. jumper wires. 4. LED. 5. Resistance 330 ohm . 6. Potentiometer 5kohm.
- 39. P4-ARDUINO WITH PWM(CONT.) Circuit Design:
- 40. P3-ARDUINO WITH POTENTIOMETER (CONT.) Code:
- 42. LIQUID CRYSTAL DISPLAY (LCD) Parallel LCD Pins PIN1 or VSS to ground PIN2 or VDD or VCC to +5v power PIN3 or VEE to ground (gives maximum contrast best for a beginner) PIN4 or RS (Register Selection) to PIN0 of ARDUINO UNO PIN5 or RW (Read/Write) to ground (puts LCD in read mode eases the communication for user) PIN6 or E (Enable) to PIN1 of ARDUINO UNO PIN11 or D4 to PIN8 of ARDUINO UNO PIN12 or D5 to PIN9 of ARDUINO UNO PIN13 or D6 to PIN10 of ARDUINO UNO PIN14 or D7 to PIN11 of ARDUINO UNO PIN 15 and 16 for background light.
- 43. LIQUID CRYSTAL DISPLAY (LCD)(CONT.) Parallel LCD Connection
- 44. LIQUID CRYSTAL DISPLAY (LCD)(CONT.) Series I2C LCD Connection
- 45. LIQUID CRYSTAL DISPLAY (LCD)(CONT.) Basics of the I2C Communication Protocol SDA (Serial Data) – The line for the master and slave to send and receive data. SCL (Serial Clock) – The line that carries the clock signal.
- 46. LIQUID CRYSTAL DISPLAY (LCD)(CONT.) I2C pins in Arduino Uno.
- 47. P5-ARDUINO WITH LCD Apparatus: 1. Breadboard. 2. Arduino UNO. 3. jumper wires. 4. LCD. 5. Resistance 330 ohm . 6. Potentiometer 5kohm.
- 48. P5-ARDUINO WITH LCD (CONT.) -Important LCD instructions: - #include< LiquidCrystal.h> This library allows an Arduino board to control LiquidCrystal displays (LCDs). - lcd.begin(16,2) This instruction use to set up the LCD's number of columns and rows. - lcd.print("Message") This instruction used for print a message to the LCD if need to display numbers must remove the double quotation mark like this {lcd.print(var)}. - lcd.setCursor(j, i) This instruct used for determine site scripting as row and column where,( j) represent the column and (i) represent the row. The figure below shows us the locations of rows and columns in the 2x16 Liquid Crystal Display.
- 49. P5-ARDUINO WITH LCD (CONT.) -Important LCD instructions: - lcd.clear( ) : This instruction used to clear the screen . - delay(n): This instruct used to give delay time where,(n) is an integer number in millisecond.
- 50. P5-ARDUINO WITH LCD (CONT.) Circuit Design:
- 52. P5-ARDUINO WITH LCD -Important I2C LCD instructions: - #include <Wire.h> This library allows you to communicate with I2C / TWI devices. - #include <LiquidCrystal_I2C.h> This library allows an Arduino board to control I2C LiquidCrystal displays (LCDs). - lcd.init() initialize the lcd.
- 53. P5-ARDUINO WITH LCD (CONT.) Circuit Design:
- 56. MOTION SENSOR (PIR) • The module actually consists of a Pyroelectric sensor which generates energy when exposed to heat.
- 58. MOTION SENSOR (PIR) • There are two potentiometers on the board to adjust a couple of parameters: • Sensitivity– This sets the maximum distance that motion can be detected. It ranges from 3 meters to approximately 7 meters. The topology of your room can affect the actual range you achieve. • Time– This sets how long that the output will remain HIGH after detection. At minimum it is 3 seconds, at maximum it is 300 seconds or 5 minutes. • H– This is the Hold/Repeat/Retriggering In this position the HC- SR501 will continue to output a HIGH signal as long as it continues to detect movement. • L– This is the Intermittent or No-Repeat/Non-Retriggering In this position the output will stay HIGH for the period set by the TIME potentiometer adjustment.
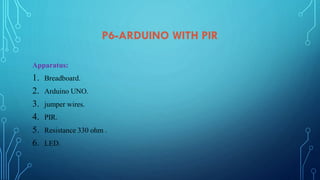
- 59. P6-ARDUINO WITH PIR Apparatus: 1. Breadboard. 2. Arduino UNO. 3. jumper wires. 4. PIR. 5. Resistance 330 ohm . 6. LED.
- 60. P6-ARDUINO WITH PIR(CONT.) Circuit Design:
- 63. DIGITAL HUMIDITY AND TEMPERATURE (DHT)
- 64. DIGITAL HUMIDITY AND TEMPERATURE (DHT) • DHT11 with MCU
- 65. P7-ARDUINO WITH DHT11 Circuit Design:
- 69. LM35 TEMPERATURE SENSOR • The LM35 is an integrated circuit sensor that can be used to measure temperature with an electrical output proportional to the temperature (in 𝑜C), It has an output voltage that is proportional to the Celsius temperature 10 mv for 1 Celsius, the accuracy of reading up to ±0.5 𝑜C the rated range of LM35 is −55°C to +150°C. • The general equation to convert the voltage into temperature is given below:
- 70. P8-ARDUINO WITH LM35 Apparatus: 1. Breadboard. 2. Arduino UNO. 3. jumper wires. 4. LM35. 5. Resistance 330 ohm . 6. LED.
- 71. P8-ARDUINO WITH LM35(CONT.) Circuit Design:
- 73. P9-ARDUINO WITH GAS SENSOR
- 74. GAS SENSOR
- 75. P9-ARDUINO WITH GAS SENSOR Apparatus: 1. Breadboard. 2. Arduino UNO. 3. jumper wires. 4. Gas sensor.
- 76. P9-ARDUINO WITH GAS SENSOR(CONT.) Circuit Design:
- 77. P9-ARDUINO WITH GAS SENSOR(CONT.) Code:
- 78. P10-ARDUINO WITH DC MOTOR
- 79. DC MOTOR & L298D DRIVER
- 80. P10-ARDUINO WITH DC MOTOR Apparatus: 1. Breadboard. 2. Arduino UNO. 3. jumper wires. 4. Battery. 5. Motor driver L298D. 6. Small DC motor.
- 81. P10-ARDUINO WITH DC MOTOR(CONT.) Circuit Design:
- 82. P10-ARDUINO WITH DC MOTOR(CONT.) Code:
- 83. P11-ARDUINO WITH SERVO MOTOR
- 84. SERVO MOTOR The servo motor unlike dc motors; with servo motors you can position the motor shaft at a specific position (angle) using control signal. The motor shaft will hold at this position as long as the control signal not changed. This is very useful for controlling robot arms, unmanned airplanes control surface or any object that you want it to move at certain angle and stay at its new position.
- 85. SERVO MOTOR Servo motor working principle:
- 86. P11-ARDUINO WITH SERVO MOTOR Apparatus: 1. Breadboard. 2. Arduino UNO. 3. jumper wires. 4. Servo Motor.
- 87. P11-ARDUINO WITH SERVO MOTOR (CONT.) important servo motor instructions: These instructions found in the library following: #include <Servo.h> 1-Servo myservo: create servo object to control a servo where, my servo is variable! 2- myservo.attach(pin number): attaches the servo on pin number such(pin 9) to the servo object. 3-myservo.write(pos): tell servo to go to position in variable 'pos" such 20 degree,90degree … etc '
- 88. P11-ARDUINO WITH SERVO MOTOR (CONT.) Circuit Design:
- 89. P11-ARDUINO WITH SERVO MOTOR (CONT.) Code:
- 91. BLUETOOTH HC-06 & HC-05
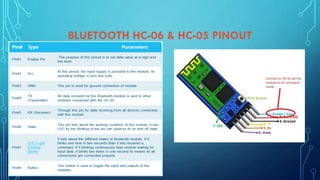
- 92. BLUETOOTH HC-06 & HC-05 PINOUT
- 93. BLUETOOTH HC-06 & HC-05 PINOUT
- 94. P12-ARDUINO WITH BLUETOOTH AT Command Mode: AT mode refers to the form of communication to the HC-05 Bluetooth Module. AT Commands are short for ATtention Commandswhich is a command languageused for modems known as theHayes command set. Hayes command setis a specific command language originally developed by Dennis Hayes for the Hayes Smartmodem 300 baud modem in 1981 [2].The HC-05 Bluetooth Module was used due to its ability to be configuredas Master or Slave mode as well as adding a password to the module.
- 95. P12-ARDUINO WITH BLUETOOTH(CONT.) AT Command Mode (Bluetooth Connection):
- 96. P12-ARDUINO WITH BLUETOOTH(CONT.) AT Command Mode (Bluetooth Connection) (Cont.): The red LED has 3 continuous flashing modes: ON for 2 seconds and Off for 2 seconds (AT Command Mode), fast blinking (searching for a connection), Off for 2 seconds and blinks twice (connected).
- 97. P12-ARDUINO WITH BLUETOOTH(CONT.) Enter to AT Command Mode : To enter AT Command Mode the following must be done: 1.Arduino Uno must be connected to the Computer via USB and Arduino software opened 2.The Module must be disconnected from Arduino 3.Arduino needs to have a Blank Sketch downloaded
- 98. P12-ARDUINO WITH BLUETOOTH(CONT.) Enter to AT Command Mode : (Cont.) 4.The Button Switch must be held pushed and simultaneously connected to the Arduino as seen in figure 2 (This is done most easily if using a breadboard). 5.The Button Switch can be released once connected to Arduino and the Bluetooth Module LED should be blinking ON for 2 seconds and Off for 2 seconds indicating it has entered AT Command Mode 6.The Correct COM Port should be Selected and Serial Monitor needs to be opened as seen in figure.
- 99. P12-ARDUINO WITH BLUETOOTH(CONT.) Enter to AT Command Mode : (Cont.) Serial Monitor: 7.38400 baud rate should be selected and “Both NL & CR” as seen in figure.
- 100. P12-ARDUINO WITH BLUETOOTH(CONT.) AT Command Master Mode :
- 101. P12-ARDUINO WITH BLUETOOTH(CONT.) AT Command Slave Mode :
- 102. P12-ARDUINO WITH BLUETOOTH(CONT.) AT Command Slave Mode :
- 103. P12-ARDUINO WITH BLUETOOTH(CONT.) Apparatus: 1. Breadboard. 2. Arduino UNO. 3. jumper wires. 4. Bluetooth HC-06 or HC-05.
- 104. P12-ARDUINO WITH BLUETOOTH(CONT.) Application: Arduino Bluetooth Control
- 105. P12-ARDUINO WITH BLUETOOTH(CONT.) Circuit Design:
- 108. ULTRASONIC SENSOR An ultrasonic sensor is an electronic device that measures the distance of a target object by emitting ultrasonic sound waves, and converts the reflected sound into an electrical signal. Ultrasonic waves travel faster than the speed of audible sound (i.e. the sound that humans can hear). Ultrasonic sensors have two main components: the transmitter (which emits the sound using piezoelectric crystals) and the receiver (which encounters the sound after it has travelled to and from the target).
- 110. ULTRASONIC HC-SR04 MODULE TIMING DIAGRAM
- 111. ULTRASONIC HC-SR04 MODULE TIMING DIAGRAM
- 112. P13-ARDUINO WITH ULTRASONIC Apparatus: 1. Breadboard. 2. Arduino UNO. 3. jumper wires. 4. Ultrasonic HC-SR04.
- 113. P13-ARDUINO WITH ULTRASONIC (CONT.) Circuit Design:
- 114. P13-ARDUINO WITH ULTRASONIC (CONT.) Code:
- 115. P14-ARDUINO WITH IR SENSOR
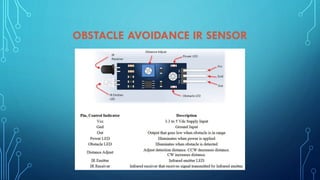
- 116. OBSTACLE AVOIDANCE IR SENSOR
- 117. OBSTACLE AVOIDANCE IR SENSOR
- 118. OBSTACLE AVOIDANCE IR SENSOR
- 119. P14-ARDUINO WITH IR SENSOR Apparatus: 1. Breadboard. 2. Arduino UNO. 3. jumper wires. 4. IR Sensor.
- 120. P14-ARDUINO WITH IR SENSOR(CONT.) Circuit Design:
- 121. P14-ARDUINO WITH IR SENSOR(CONT.) Code:
- 122. thanks
- 123. Email: [email protected] linkden: www.linkedin.com/in/elaf-a-saeed-97bbb6150 facebook: https://www.facebook.com/profile.php?id=100004305557442 github: https://github.com/ElafAhmedSaeed youtube: https://youtube.com/channel/UCE_RiXkyqREUdLAiZcbBqSg slideshare: https://www.slideshare.net/ElafASaeed Slideplayer: https://slideplayer.com/search/?q=Elaf+A.Saeed Google Scholar: https://scholar.google.com/citations?user=VIpVZKkAAAAJ&hl=ar&gmla=AJsN- F7PIgAjWJ44Hzb18fwPqJaaUmG0XzbLdzx09