Arduino is an open-source project that created microcontroller-based kits for building digital devices and interactive objects that can sense and control physical devices.
1. The document provides step-by-step instructions for setting up the Arduino IDE software and connecting an Arduino board to a computer. It explains how to select the board type and serial port, and upload a program to make an LED blink.
2. Key steps include downloading the Arduino IDE, selecting the board type in Tools, choosing the serial port, and uploading a basic blink program to test that the board is connected properly.
3. The document also provides an overview of programming concepts for Arduino like using variables, constants, and the setup and loop functions.
The document discusses Arduino, an open-source electronics prototyping platform. It describes Arduino Uno, including its processor, memory, input/output pins, and operating voltage. It provides steps for getting started with Arduino, including downloading the IDE, connecting the board, selecting options in the IDE, and uploading a basic blink program. The document also covers some key Arduino concepts like variables, conditional statements, loops, and functions.
The document discusses the Arduino integrated development environment (IDE). It states that Arduino is an open-source hardware and software platform that uses a microcontroller board that can be programmed. The Arduino IDE is used to write code and upload it to the physical board. Key features include reading analog/digital signals from sensors and outputting actions, uploading instructions to the microcontroller via the IDE, and loading new code onto the board using a USB cable without extra hardware. The Arduino IDE uses a simplified version of C++. Arduino programs are written in the IDE as sketches, based on a simplified version of the C language. Main parts of sketches include structure, values like variables and constants, and functions.
The document provides an overview of the Thinklab Workshop for Day 1 on Arduino Introduction and Fundamentals. It covers topics such as microcontrollers, the Arduino platform, getting started with Arduino, interfacing fundamentals including variables, control structures, logic, math commands, timing controls, random numbers, functions, and serial communications. Participants will learn about the Arduino IDE, uploading programs, digital and analog I/O, and using the serial monitor to send and receive data.
This document provides an introduction and overview of Arduino and C programming. It covers the following key points:
1. The presentation covers assumptions about the audience's programming experience and goals of being able to create Arduino applications using shields, libraries, control flows, functions, reading connection diagrams, and debugging.
2. The agenda includes introductions to the Arduino hardware, IDE, variables, control flow, loops, arrays, strings, functions, libraries, I/O, connection diagrams, and EEPROM.
3. The Arduino is a microcontroller that can be programmed to read sensors, run motors and lights, and send/receive data via various shields and accessories. The Arduino IDE is
The document discusses open source hardware and the open source nature of projects from SparkFun and .:oomlout:. Open source means designs, guides, code, and 3D models are freely available to download, reproduce, modify, and distribute under a Creative Commons license as long as credit is given and developments are shared in a similar open manner. The goal is to make physical things as accessible and fun to learn with as open source software has been.
Here are the key things to know about some common electronic components:
DC Motor:
- What it Does: Spins when a current is passed through its leads. It converts electrical energy to mechanical motion/rotation.
- No. of Leads: Typically has 2 leads - one positive and one negative. Current must flow through the motor in one direction for it to spin.
LED (Light Emitting Diode):
- What it Does: Emits light when current passes through it in the correct direction. Common colors are red, green, blue, yellow, white.
- No. of Leads: Has 2 leads, one longer than the other. The longer lead is positive and must be connected to
4 IOT 18ISDE712 MODULE 4 IoT Physical Devices and End Point-Aurdino Uno.pdfJayanthi Kannan MK
The document discusses the Arduino Uno microcontroller board. It provides details about the Arduino platform and describes the Arduino Uno board, which is based on the ATmega328P microcontroller. It lists the main components of the Arduino Uno board and explains the functions of pins and inputs/outputs. The document also provides an overview of the fundamentals of Arduino programming, including key functions, variables, conditions, and serial communication.
This document provides an overview of Arduino programming concepts including:
- Microcontrollers contain a CPU, memory, input/output pins and other peripherals on a single integrated circuit.
- Arduino is an open-source electronics platform with a microcontroller, pins to connect circuits, and software to program it.
- The core Arduino functions include setup(), loop(), pinMode(), digitalWrite(), digitalRead(), analogWrite(), analogRead(), and delay().
- Examples demonstrate blinking LEDs, reading input, using conditions and loops, arrays, LCD displays, and controlling servo motors.
- Arduino programming provides an accessible way to learn embedded systems and interact with circuits.
1.Gives basic idea about what is arduino? and their funtionalites.
2. Applications of arduino
3. Adruino programming
4. what is Nodemcu ?
5. pindiagram of Nodemcu
[Apostila] programação arduíno brian w. evansWeb-Desegner
This document provides a summary of the Arduino Programming Notebook. It describes the basic structure of Arduino programs, which includes a setup() function that runs once and a loop() function that runs continuously. It also covers common programming elements like variables, data types, arithmetic operations, flow control, and digital and analog I/O. The notebook is intended as a beginner's reference for the Arduino syntax and includes code examples and an appendix with sample circuits and programs.
This document provides an overview of key concepts for using the Arduino environment including board type, serial ports, parts of a sketch like setup and loop functions, variables, data types, operators, conditional statements, and repetition structures like for and while loops. Comments, pin modes, and interrupts are also introduced. The document explains syntax and provides examples to demonstrate how these concepts work together in Arduino code.
The document summarizes the basics of Arduino programming. It discusses that Arduino programs have three main parts: structure, values (variables and constants), and functions. It describes the setup() and loop() functions that enclose blocks of code. Setup() initializes variables and runs once, while loop() continuously runs the main program code. It also discusses defining variables, data types, and writing custom functions. Finally, it provides an example of blinking an LED using the Arduino by wiring an LED, resistor and running a program to turn the LED on and off.
This document outlines the syllabus for a course on Internet of Things (IoT) technology taught by Dr. Syed Mustafa at HKBK College of Engineering, Bengaluru. It covers key modules including IoT physical devices and endpoints such as Arduino and Raspberry Pi. The Arduino section describes the Arduino microcontroller board and its components. It also covers Arduino programming basics like setup and loop functions, input/output functions, variables, conditional statements, and serial communication. The Raspberry Pi section provides an overview of the single-board computer and its hardware layout.
The document describes an Arduino-based home automation system that can sense various parameters like temperature, distance, light, and detect burglars. It transmits the sensor data to an Arduino board which processes the data and checks it against the program code to control devices like fans accordingly. The system also allows users to set alerts. It then provides details about Arduino programming, including the languages, code structure, and functions used. It gives an example of a circuit and code to light LEDs and explains various Arduino functions like pinMode(), digitalWrite(), analogRead() etc.
This document provides an overview of how to use Arduino microcontrollers for beginners. It explains what Arduino is, the basic components and programming structure used in Arduino, and how to get started with coding and hardware setup. The key aspects covered include computers and programming languages, microcontrollers and their applications, Arduino development boards, initial setup steps, basics of Arduino coding like initialization, setup, loop, and user defined functions. It also discusses analog and digital signals, serial communication, and tips for wiring and coding Arduino projects.
What is a "microcontroller"?
This slideshow is an introduction to the concept of a micro, an overview of several types and finally, a focused intro to Arduino and how to program one.
The document provides an introduction to Arduino and physical computing using microcontrollers. It describes that Arduino boards use ATmega microcontrollers and can be programmed to sense the physical world using sensors, process data, and control physical devices using actuators. The document outlines the basic components of a microcontroller, how the Arduino programming environment works, and the basic structure and functions used in Arduino programs.
The document describes the components and programming of Arduino boards. It discusses the major hardware components of Arduino boards including the microcontroller, analog and digital pins, power supply, and USB connector. It then explains the Arduino IDE software environment for writing, compiling and uploading code to Arduino boards. Finally, it covers basic Arduino programming concepts such as setup and loop functions, if/else statements, and functions for digital input/output, analog input, and PWM output.
Arduino: On-board components description, IDE and Programming Pawan Dubey, PhD
The document describes the components and programming of Arduino boards. It discusses the major hardware components of Arduino boards including the microcontroller, analog and digital pins, power supply, and USB interface. It then explains the Arduino IDE software for writing, compiling and uploading code to Arduino boards. Finally, it covers basic Arduino programming concepts such as setup and loop functions, if/else statements, and functions for digital input/output, analog input, and PWM output.
The document provides an introduction to programming with Arduino. It explains that Arduino is an open-source hardware and software platform used to build interactive electronic projects. It consists of a microcontroller board that can be programmed and used to read and control sensors, LEDs, motors and more. The document outlines the basic steps to get started which include downloading the Arduino IDE, installing drivers, selecting the board type, and uploading a test "Blink" program to make an LED turn on and off. It also provides explanations of some core electronic components like resistors, LEDs, sensors and describes how to set up a simple temperature sensing project and store the sensor readings in a database.
Introduction to Arduino Hardware and ProgrammingEmmanuel Obot
Introduction to Arduino Hardware and Programming:
Arduino is an open-source electronics platform based on easy-to-use hardware and software. It's intended for anyone making interactive projects.
Teachers and students use it to build low cost scientific instruments, to prove chemistry and physics principles, or to get started with programming and robotics. Designers and architects build interactive prototypes, musicians and artists use it for installations and to experiment with new musical instruments. Makers, of course, use it to build many of the projects exhibited at the Maker Faire. Arduino is a key tool to learn new things. Anyone - children, hobbyists, artists, programmers can use it to build an interactive device.
This document provides an introduction to Arduino, including an overview of the Arduino Uno board, the development environment, programming basics like sketches and libraries, and common programming structures like loops and conditional statements. Key topics covered include how to program the Arduino Uno using the Arduino IDE, specifications of the Uno board, memory types on the Arduino, and examples of for loops, if/else statements, and switch/case in sketches. Standard Arduino libraries are also introduced.
Arduino_CSE ece ppt for working and principal of arduino.pptSAURABHKUMAR892774
The document provides an introduction and overview of Arduino boards and programming. It discusses:
- The different types of Arduino boards available.
- How to get started with the Arduino IDE and programming Arduino boards.
- Examples of common sensors and actuators that can be connected to Arduino boards like LEDs, buttons, temperature sensors.
- The basic structure of Arduino programs including setup(), loop(), and common functions like digitalRead(), digitalWrite(), and pinMode().
This document provides an overview of key concepts for programming Arduino boards including comments, variables, logic operators, and loops. It explains that comments are lines of text preceded by // or between /* and */. Variables can be boolean, integer, character, or strings, and are declared with keywords like boolean or int followed by the variable name. Common logic operators include = for assignment, == for comparison, && for AND, and || for OR. The Arduino setup function is used to initialize pins and serial communication. The loop function repeats code continuously. For, while, and basic repetition are covered with for loops iterating with a counter variable and while loops checking a condition.
TEST ON ANALOGY.pptx dd dd dd d d d d dunicaeli2020
The document contains a test on analogies with 7 multiple choice questions. Each question provides a pair of related words and asks to complete the analogy by choosing the best match from 3 answer choices to the missing term. The questions cover a range of analogies relating to places, words with similar meanings, and things that commonly go together.
This document discusses analogy, search engines, and oral communication. It defines analogy as a relationship between two terms, and lists seven types of analogical relationships including part-to-whole, cause-and-effect, synonym, and antonym. It then discusses search engines, defining them as software systems that search databases and websites. It lists the top five most commonly used search engines as Google, Bing, Yahoo, Ask, and AOL. Finally, it discusses oral language, defining it as using knowledge and skills to speak and listen effectively through clear language, tone, and appropriateness. It also discusses stance, behavior, facial expressions and eye contact as important nonverbal elements of oral communication.
Pollution and Road Safety Grade 10 Health 2nd Gradingunicaeli2020
Pollution is the introduction of harmful materials called pollutants into the environment which can damage the quality of air, water and land. The three most common types of pollution are discussed. Methods for reducing pollution include reducing waste, recycling, volunteering for cleanups, educating others, conserving water, choosing sustainable options, shopping wisely, using long-lasting light bulbs and planting trees. Road safety aims to reduce traffic injuries and deaths through measures like wearing seatbelts and helmets, being careful of speed limits, not drinking and driving, and staying alert while indicating and obeying traffic signals.
Creating an Accessible Future-How AI-powered Accessibility Testing is Shaping...Impelsys Inc.
Web accessibility is a fundamental principle that strives to make the internet inclusive for all. According to the World Health Organization, over a billion people worldwide live with some form of disability. These individuals face significant challenges when navigating the digital landscape, making the quest for accessible web content more critical than ever.
Enter Artificial Intelligence (AI), a technological marvel with the potential to reshape the way we approach web accessibility. AI offers innovative solutions that can automate processes, enhance user experiences, and ultimately revolutionize web accessibility. In this blog post, we’ll explore how AI is making waves in the world of web accessibility.
Your startup on AWS - How to architect and maintain a Lean and Mean account J...angelo60207
Prevent infrastructure costs from becoming a significant line item on your startup’s budget! Serial entrepreneur and software architect Angelo Mandato will share his experience with AWS Activate (startup credits from AWS) and knowledge on how to architect a lean and mean AWS account ideal for budget minded and bootstrapped startups. In this session you will learn how to manage a production ready AWS account capable of scaling as your startup grows for less than $100/month before credits. We will discuss AWS Budgets, Cost Explorer, architect priorities, and the importance of having flexible, optimized Infrastructure as Code. We will wrap everything up discussing opportunities where to save with AWS services such as S3, EC2, Load Balancers, Lambda Functions, RDS, and many others.
Trends Artificial Intelligence - Mary MeekerClive Dickens
Mary Meeker’s 2024 AI report highlights a seismic shift in productivity, creativity, and business value driven by generative AI. She charts the rapid adoption of tools like ChatGPT and Midjourney, likening today’s moment to the dawn of the internet. The report emphasizes AI’s impact on knowledge work, software development, and personalized services—while also cautioning about data quality, ethical use, and the human-AI partnership. In short, Meeker sees AI as a transformative force accelerating innovation and redefining how we live and work.
Boosting MySQL with Vector Search -THE VECTOR SEARCH CONFERENCE 2025 .pdfAlkin Tezuysal
As the demand for vector databases and Generative AI continues to rise, integrating vector storage and search capabilities into traditional databases has become increasingly important. This session introduces the *MyVector Plugin*, a project that brings native vector storage and similarity search to MySQL. Unlike PostgreSQL, which offers interfaces for adding new data types and index methods, MySQL lacks such extensibility. However, by utilizing MySQL's server component plugin and UDF, the *MyVector Plugin* successfully adds a fully functional vector search feature within the existing MySQL + InnoDB infrastructure, eliminating the need for a separate vector database. The session explains the technical aspects of integrating vector support into MySQL, the challenges posed by its architecture, and real-world use cases that showcase the advantages of combining vector search with MySQL's robust features. Attendees will leave with practical insights on how to add vector search capabilities to their MySQL systems.
Integration of Utility Data into 3D BIM Models Using a 3D Solids Modeling Wor...Safe Software
Jacobs has developed a 3D utility solids modelling workflow to improve the integration of utility data into 3D Building Information Modeling (BIM) environments. This workflow, a collaborative effort between the New Zealand Geospatial Team and the Australian Data Capture Team, employs FME to convert 2D utility data into detailed 3D representations, supporting enhanced spatial analysis and clash detection.
To enable the automation of this process, Jacobs has also developed a survey data standard that standardizes the capture of existing utilities. This standard ensures consistency in data collection, forming the foundation for the subsequent automated validation and modelling steps. The workflow begins with the acquisition of utility survey data, including attributes such as location, depth, diameter, and material of utility assets like pipes and manholes. This data is validated through a custom-built tool that ensures completeness and logical consistency, including checks for proper connectivity between network components. Following validation, the data is processed using an automated modelling tool to generate 3D solids from 2D geometric representations. These solids are then integrated into BIM models to facilitate compatibility with 3D workflows and enable detailed spatial analyses.
The workflow contributes to improved spatial understanding by visualizing the relationships between utilities and other infrastructure elements. The automation of validation and modeling processes ensures consistent and accurate outputs, minimizing errors and increasing workflow efficiency.
This methodology highlights the application of FME in addressing challenges associated with geospatial data transformation and demonstrates its utility in enhancing data integration within BIM frameworks. By enabling accurate 3D representation of utility networks, the workflow supports improved design collaboration and decision-making in complex infrastructure projects
Floods in Valencia: Two FME-Powered Stories of Data ResilienceSafe Software
In October 2024, the Spanish region of Valencia faced severe flooding that underscored the critical need for accessible and actionable data. This presentation will explore two innovative use cases where FME facilitated data integration and availability during the crisis. The first case demonstrates how FME was used to process and convert satellite imagery and other geospatial data into formats tailored for rapid analysis by emergency teams. The second case delves into making human mobility data—collected from mobile phone signals—accessible as source-destination matrices, offering key insights into population movements during and after the flooding. These stories highlight how FME's powerful capabilities can bridge the gap between raw data and decision-making, fostering resilience and preparedness in the face of natural disasters. Attendees will gain practical insights into how FME can support crisis management and urban planning in a changing climate.
Establish Visibility and Manage Risk in the Supply Chain with Anchore SBOMAnchore
Over 70% of any given software application consumes open source software (most likely not even from the original source) and only 15% of organizations feel confident in their risk management practices.
With the newly announced Anchore SBOM feature, teams can start safely consuming OSS while mitigating security and compliance risks. Learn how to import SBOMs in industry-standard formats (SPDX, CycloneDX, Syft), validate their integrity, and proactively address vulnerabilities within your software ecosystem.
This OrionX's 14th semi-annual report on the state of the cryptocurrency mining market. The report focuses on Proof-of-Work cryptocurrencies since those use substantial supercomputer power to mint new coins and encode transactions on their blockchains. Only two make the cut this time, Bitcoin with $18 billion of annual economic value produced and Dogecoin with $1 billion. Bitcoin has now reached the Zettascale with typical hash rates of 0.9 Zettahashes per second. Bitcoin is powered by the world's largest decentralized supercomputer in a continuous winner take all lottery incentive network.
Scaling GenAI Inference From Prototype to Production: Real-World Lessons in S...Anish Kumar
Presented by: Anish Kumar
LinkedIn: https://www.linkedin.com/in/anishkumar/
This lightning talk dives into real-world GenAI projects that scaled from prototype to production using Databricks’ fully managed tools. Facing cost and time constraints, we leveraged four key Databricks features—Workflows, Model Serving, Serverless Compute, and Notebooks—to build an AI inference pipeline processing millions of documents (text and audiobooks).
This approach enables rapid experimentation, easy tuning of GenAI prompts and compute settings, seamless data iteration and efficient quality testing—allowing Data Scientists and Engineers to collaborate effectively. Learn how to design modular, parameterized notebooks that run concurrently, manage dependencies and accelerate AI-driven insights.
Whether you're optimizing AI inference, automating complex data workflows or architecting next-gen serverless AI systems, this session delivers actionable strategies to maximize performance while keeping costs low.
Developing Schemas with FME and Excel - Peak of Data & AI 2025Safe Software
When working with other team members who may not know the Esri GIS platform or may not be database professionals; discussing schema development or changes can be difficult. I have been using Excel to help illustrate and discuss schema design/changes during meetings and it has proven a useful tool to help illustrate how a schema will be built. With just a few extra columns, that Excel file can be sent to FME to create new feature classes/tables. This presentation will go thru the steps needed to accomplish this task and provide some lessons learned and tips/tricks that I use to speed the process.
Domino IQ – Was Sie erwartet, erste Schritte und Anwendungsfällepanagenda
Webinar Recording: https://www.panagenda.com/webinars/domino-iq-was-sie-erwartet-erste-schritte-und-anwendungsfalle/
HCL Domino iQ Server – Vom Ideenportal zur implementierten Funktion. Entdecken Sie, was es ist, was es nicht ist, und erkunden Sie die Chancen und Herausforderungen, die es bietet.
Wichtige Erkenntnisse
- Was sind Large Language Models (LLMs) und wie stehen sie im Zusammenhang mit Domino iQ
- Wesentliche Voraussetzungen für die Bereitstellung des Domino iQ Servers
- Schritt-für-Schritt-Anleitung zur Einrichtung Ihres Domino iQ Servers
- Teilen und diskutieren Sie Gedanken und Ideen, um das Potenzial von Domino iQ zu maximieren
Providing an OGC API Processes REST Interface for FME FlowSafe Software
This presentation will showcase an adapter for FME Flow that provides REST endpoints for FME Workspaces following the OGC API Processes specification. The implementation delivers robust, user-friendly API endpoints, including standardized methods for parameter provision. Additionally, it enhances security and user management by supporting OAuth2 authentication. Join us to discover how these advancements can elevate your enterprise integration workflows and ensure seamless, secure interactions with FME Flow.
Providing an OGC API Processes REST Interface for FME FlowSafe Software
Ad
Lesson-4-Arduino-Programming-dsBasics.pdf
2. WHAT IS A PROGRAM
is a written programming language which enables a computer to
perform its function. Therefore, a program is a written instruction that
process input, manipulate data, and output a result.
Arduino uses C / C++ Programming language. C was created by
Dennis Ritchie between 1969 -1973 and in 1979, Bjarne Stroustrup
created C with classes known as C++.
Both programming languages are still popular in programming
microcontrollers. In programming, we use a combination of letters,
words, and symbols, which are known as Tokens. All written codes will
go through a compiler to convert it to machine language.
3. Transducers
A Transducer is a device that converts energy from one form to
another. These devices are often used for automation,
measurement, and control system.
Sensors - are transducers that receive signals or stimulus from an
environment or physical system. Converts stimulus into electrical
signal.
Actuators - are transducers that actuate or move something -
converting electrical signal into actions.
4. Types of Signal
Analog - It can take up any number of values
or readings (Ex. Temperature)
Digital - It is represented by 2 values: either High
or Low or On or Off
5. Programming Syntax
Syntax refers to a set of rules used to determine if a
certain group of words forms a valid sentence - which is
also true in computer programming.
Arduino follows the C/C++ language. These two
programming languages use the same syntax.
void setup{ }
Void setup is technically a function that you create at the
top of each program. Inside the curly brackets is the
code that you want to run one time as soon as the
program starts running. You set things like pinMode in this
section.
6. void loop { }
The void loop is a function that Arduino integrates as a part of its
structure. Every command that is inside the loop will run
continuously as long as the microcontroller is turned on.
7. ; (semicolon)
Signifies an end on the command line. Since the compiler does
not read spaces in the program, it looks for semicolons to read
every end of the statements.
8. { } curly braces
A group of code statements. When troubleshooting your
program, always check first the curly braces if all opening curly
braces have partner closing curly braces.
() parentheses
A group of arguments for a function, a method, or a code
statement. Since programming languages follow PEMDAS
(Parenthesis, Equation, Multiplication, Division, Addition,
Subtraction), you can also use it to group math within equations.
Ex. random( (5-2), (480 - 220));With the example above, the result
will be: random(3,260);
10. // single line comment
When you type two forward slashes, the compiler ignores the
code from that point until the end of the line. Use comments to
clarify what the code does, to remember how the hardware is
connected, or to delete code from the software without
removing it entirely.
/* multi-line comment */
A multi-line comment needs to have /* as its opening and */ as
its closing. All characters between the symbols will be
considered as a comment. When you have a lot to type, use a
multi-line comment to make it easier to group the information
together.
12. Variables
A variable can store data from a sensor or results in a calculation.
These variables can then be called for later use in the program.
14. Using and Naming a Variable
Creating a Variable; To create a variable in C/C++. We must follow
these basic steps:
Declaration - before a variable is used, we need to declare it first to
inform the compiler about the data type and size. The syntax in
declaring a variable is simple:
Type the data type - for example, "int" for integer type of data.
Followed by the identifier or the name of the variable
In naming a variable, we must be mindful of the following:
Its name must start with a letter.
It may contain letters, numbers, and the underscore character.
It should not be a reserved word in the Arduino IDE.
It should not contain white spaces.
15. Initialization of Variables - after declaring the variable, its value is set to default unless we assign
value to it. It is also possible to place value on the variable from the moment that it is declared.
We created 1 variable to store pin number of the LED that we will use for the activity – led_1
16. Programming a circuit
Void setup is technically a function that you create at the top of
each program. Every code that is inside the curly braces will run
once as soon as the program starts running.
The pinMode command is usually placed here so that the
microcontroller reads the pin assignment first before running
other commands.
The setup() runs once when the Arduino is first powered on.
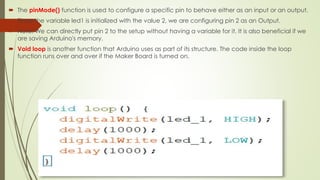
17. The pinMode() function is used to configure a specific pin to behave either as an input or an output.
Since the variable led1 is initialized with the value 2, we are configuring pin 2 as an Output.
Note: We can directly put pin 2 to the setup without having a variable for it. It is also beneficial if we
are saving Arduino's memory.
Void loop is another function that Arduino uses as part of its structure. The code inside the loop
function runs over and over if the Maker Board is turned on.
18. digitalWrite();
digitalWrite() is the command that allows you to send 5V or 0V
to an output pin. It takes two arguments: what pin to control,
and what value to set that pin, HIGH or LOW.
19. delay();
The delay() function lets you stop the Arduino from executing
anything for a period of time. delay() takes an argument that
determines the number of milliseconds before it executes the
next set of code. There are 1000 milliseconds in one second,
delay (250) will pause for a quarter of a second.